...
The The SNMP protocol protocol support is an important feature of all communication devices because it allows the system administrator to manage the operation of a network as a whole, as well as of each component.
SNMP section section contains a set of parameters to exchange data about network activity of the device.
The The SNMP Protocol Protocol has two sides, the agent and the management stations:
- The agent sends data to the management station
- The management station collects data from all the agents on the network. You can set several destinations of traps with individual set of traps as well as several users with individual access rights
- The agent sends alerts called traps (see Traps zone) and answers requests that were sent by the management station
- The management station captures and decodes the traps. The management station also requests specific information from the agent
- The information is passed through requests and replies with the use of the the MIB
- The management station is responsible for decoding the the SNMP packets packets and providing an interface to the administrator. The interface can be a a GUI or or a command line.
| Center |
|---|
| Scroll Title |
|---|
| title | Figure - SNMP section |
|---|
| 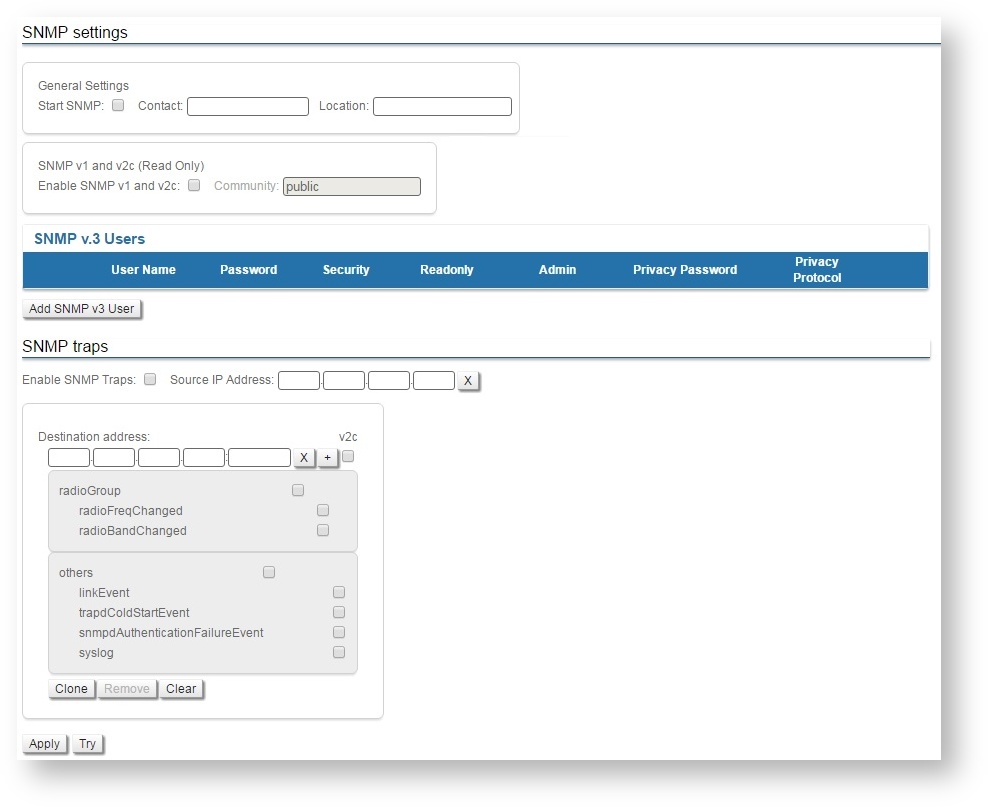 Image Added Image Added
|
|
SNMP settings
In the the SNMP settings settings section, you can view and edit the current current SNMP access access settings; you can delete the current current SNMP v v.3 users by clicking the «Remove Remove SNMP User User» button or create new ones by clicking the «Add Add SNMP v3 v3 User» button:
| Center |
|---|
| Scroll Title |
|---|
| | SNMP access parameter | Description |
|---|
| Start SNMP | - Enable/disable SNMP daemon in the device
| | Contact | - Set the contact information
- Used as a reference information about the device
|
Version 1 enable | | Location | - Set the geographical location where the unit is installed
- Used as a reference information about physical device’s location
| | Enable SNMP v1 and v2c | - Enable/disable SNMP v.1 and v.2c support
- The first version of the SNMP protocol lacks security in the operation of the protocol itself, which hinders its use for network management, so SNMP v.1 and v.2c works only in read-only mode
- By default, it is enabled
| | Community | - Set the community name for read-only mode (SNMP v.1 and v.2c only)
- The default SNMP v.1 and v.2c community name is "public"
- It is a security method for SNMP v.1 and v.2c, as
|
Agents - agents can be set to reply only to queries received by accepted community names
- In SNMP v.1 and v.2c the community name passes along with the data packet in clear text
|
Contact | Set the contact informationUsed as a reference information about the device owner| Location | - Set the geographical location where the unit is installed
- Used as a reference information about physical device’s location
| | User Name | - Set the authorization user name of SNMP v.3
| | Password | - Set the authorization password of SNMP v.3
| | Security | - Set the security level:
- "No Authorization No Privacy" - the lowest level means no authentication or privacy
|
(No Authorization No Privacy)- , you have to set the User Name only
- "Authorization No Privacy" - the medium level means authorization and no privacy
|
(Authorization No Privacy)- , you have to set User Name and Password
- "Authorization and Privacy" - the highest level means authorization and privacy
|
(Authorization and Privacy)- , you have to set the User Name, Password and Privacy Password
| | Read only | - Enable/disable the read-only permission
- Read/Write is the default value
| | Admin | - Enable/disable the full access to the variables
For example, the ability to reboot the device - Limited access is the default value
| | Privacy Password | - Set the privacy password
- It is necessary when privacy is enabled for the required security level
| Privacy Protocol | - Set the encryption method for SNMP v.3: DES/AES128
|
|
|
SNMP traps
SNMP protocol protocol operation requires a network agent instance to send asynchronous messages (traps) whenever a specific event occurs on the controlled device (object). InfiNet Wireless units have a built-in "SNMP Traps Traps" support module (which acts as an agent) that performs a centralized information delivery from unit internal subsystems to the the SNMP server server. This zone focuses on "SNMP Traps Traps" agent configuration.
In this section, you can view and edit the current "SNMP
...
traps"
...
settings. You can clone, remove and clear target and traps by clicking the corresponding buttons:
| Center |
|---|
| Scroll Title |
|---|
| | SNMP traps parameter | Description |
|---|
| Enable SNMP Traps | - Enable/disable to send "SNMP traps"
|
Agent | Source IP Address | - Set the IP address of the device which sends traps; it is normally the IP address of the InfiNet Wireless unit
|
Destination| Agent IP | - Set the IP address of the server (InfiMONITOR, for example) and the UDP port (162 port is commonly used)
| | V2 | |
2 |
|
The check boxes below specify traps or trap groups that are sent to the server:
| Center |
|---|
| Scroll Title |
|---|
| title | Table - SNMP Trap Types |
|---|
| | SNMP trap types | Description |
|---|
| radioGroup | - Events which are related to changes of radio link parameters
| | radioFreqChanged | - The Frequency has changed
| | radioBandChanged | | | others | | | linkEvent | - One of the communication links represented in the agent’s configuration has come up or come down
| | trapdColdStartEvent | - Cold Start event has occurred
| | snmpdAuthenticationFailureEvent | - Not properly authenticated SNMP protocol message has been received
| | syslog | - Events about messages recorded in a system log
|
|
|
Clink the «Clone» button if you need to setup multiple multiple SNMP servers servers. Each server can have an individual set of traps directed toward it.
Click the «Clear» button in order to clear all check-boxes for the current server.
| Note |
|---|
|
Read the information at the section Apply and Try buttons for the configuration in order to find out the output of the «Apply», «Try» and buttons for the new configuration performed. |