...
- Unit role.
- Center frequency.
- Maximum transmit power.
- Frame length.
- Link ID.
- Access key.
If some parameters have different values, perform the modifications and check the wireless link establishment after unit reboot. In case the wireless link is still down, go on site to the location of the local unit and check the cables and connectors.
...
If the local connection is allowed, after the authentication step in web interface, check all radio parameters by connecting to it using a laptop. The values for the following radio parameters must be the same on both units:
...
- Center frequency.
- Frame length.
- Access key.
...
The wireless link is established but the capacity is less than expected.
| Center |
|---|
|
Step 1: Check the weather conditions
...
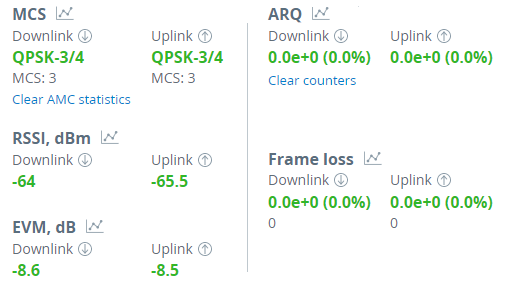
Proceed to the "Radio" section and check the frame length value, if it is too small, try to increase it. Perform the antenna alignment with built-in tool especially in case of low RSSI and EVM values.
To view parameter values changes over time, use the "Graphs" tool by clicking the diagram icon next to the selected parameter, or by going to the "Graphs" section.
Step 3: Check at the units location site
...
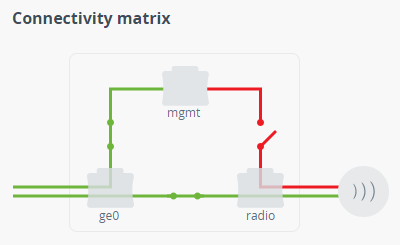
Connect to the unit web interface and check the matrix connectivity in the "Switch" section, ge0 port must be connected with the radio port.
| Center |
|---|
|
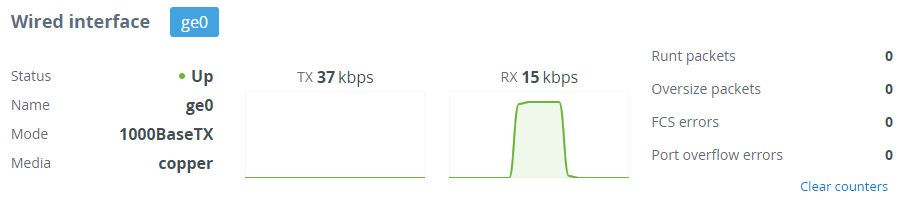
Check the operation status of the ge0 port. Enable the port if it was disabled. In case of using VLANs, proceed to the "Switch" section and make sure that the VLAN configuration is correct, the specific traffic VLAN ID is allowed to pass through the port.
...
If the port status is "Up" but no packets are received, check the configuration of the equipment which is directly connected.
| Center |
|---|
|
Step 2: Check at the units location site
...
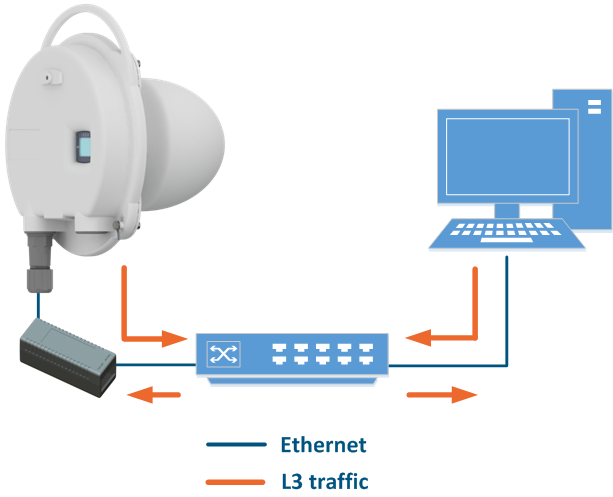
IP address should be configured on the PC for the ERConsole utility work.
| Center |
|---|
|
| Note | ||
|---|---|---|
| ||
ERConsole and Infinet Wireless units exchange information only during the bootup process, therefore each time you need to read the units IP address, to add a new IP or to restore to the default configuration, the Infinet Wireless unit should be rebooted. |
5.1. Access to the unit recovery
...
In case you need to restore your unit to the factory default settings, proceed as follows.
| Note | ||
|---|---|---|
| ||
If the management of the unit is lost due to unknown user name or password it can be restored using factory password. Enter the device serial number to the "Login" field and factory password - to the "Password" field. |
- Obtain the factory password. In order to do this, please contact the distributor through whom the unit was purchased, or in case purchasing the unit directly in Infinet Wireless, send a request to the Infinet Wireless support team. The request must include the unit serial number and the value of "Sequence" field (if it's non-zero).
- Obtain the unit IP address using the ERConsole as described in the section above.
- Click on the "+" button in the ERConsole application and a new window will appear.
Select "Reset configuration" option and enter the factory password to the "Factory password" field, then click "OK". The password must be entered at the same format as it has been got from the distributor or IW support team (with the gaps).
Center 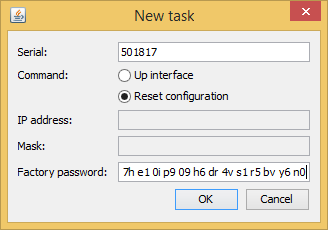
- Turn off and on the unit and then wait for about 30 seconds.
- The unit will start in a special emergency mode with the IP address 10.10.10.1 and mask 255.255.255.0.
- Login to the unit and use "Restore factory settings" button on the "Maintenance" section to switch off emergency mode.
- Set new login and password, then save the configuration and restart the unit.