...
| Step 1 | |||||||||||||||||||||||||||||||||||||||||||||||||||
|---|---|---|---|---|---|---|---|---|---|---|---|---|---|---|---|---|---|---|---|---|---|---|---|---|---|---|---|---|---|---|---|---|---|---|---|---|---|---|---|---|---|---|---|---|---|---|---|---|---|---|---|
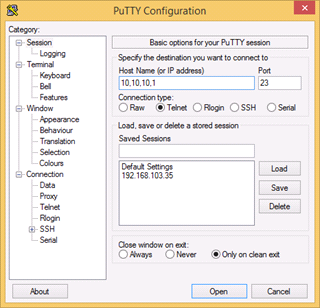
CLI is available via telnet: "cmd> telnet 10.10.10.1" or use any suitable telnet client such as Putty.
| |||||||||||||||||||||||||||||||||||||||||||||||||||
| Step 2 | |||||||||||||||||||||||||||||||||||||||||||||||||||
Use any letters or numbers for initial authentication, for example:
| |||||||||||||||||||||||||||||||||||||||||||||||||||
| Step 3 | |||||||||||||||||||||||||||||||||||||||||||||||||||
Check the firmware version and upgrade the units to the latest stable firmware version. You can check firmware version via command:
Compare current version of the unit with version on official InfiNet Infinet ftp server: ftphttps://ftp.infinet.ru/pub/Firmware/XG/H12. In case a newer version is available we recommend upgrading.
| |||||||||||||||||||||||||||||||||||||||||||||||||||
| Step 4 | |||||||||||||||||||||||||||||||||||||||||||||||||||
Configure radio parameters.
| |||||||||||||||||||||||||||||||||||||||||||||||||||
| Step 5 | |||||||||||||||||||||||||||||||||||||||||||||||||||
Save configuration.
| |||||||||||||||||||||||||||||||||||||||||||||||||||
| Step 6 | |||||||||||||||||||||||||||||||||||||||||||||||||||
Restart the unit.
| |||||||||||||||||||||||||||||||||||||||||||||||||||
| Step 7 | |||||||||||||||||||||||||||||||||||||||||||||||||||
Check the link status.
In case of success configuration:
|
...