...
| Note |
|---|
|
The NEXT monitoring system supports "authNoPriv" protected mode only. |
InfiLINK 2x2, InfiMAN 2x2, InfiLINK Evolution, InfiMAN Evolution families
There are 2 ways how to change the configuration:
...
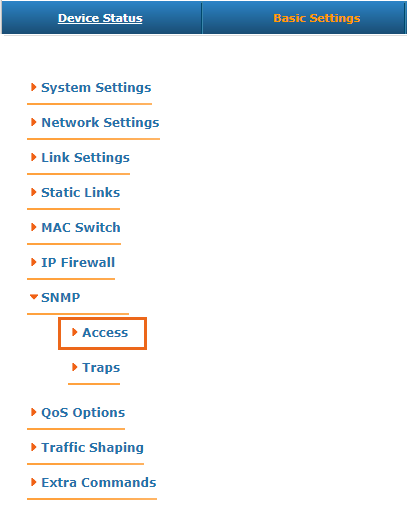
Log in to the device’s web interface. Go to the "Basic settings" page -> "SNMP" to the "Access" section:
| Center |
|---|
| Scroll Title |
|---|
| title-alignment | center |
|---|
| title | Figure - SNMP section |
|---|
|  |
|
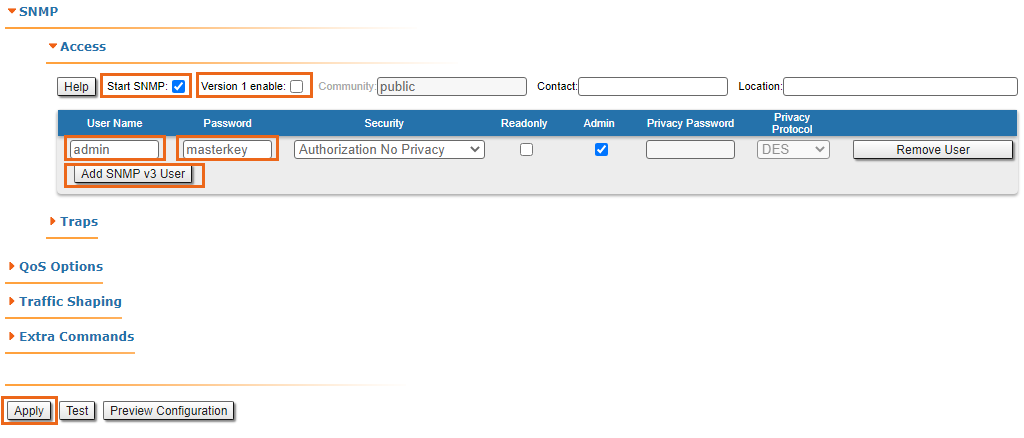
Perform the following steps:
- Set the "Start SNMP" flag to enable the SNMP Agent.
- Uncheck the "Version 1 enable" flag to disable the SNMPv1 version, which is enabled by default.
- Click the "Add SNMP v3 user" and enter the authentication data for accessing the network node via SNMP in the "Username" and "Password" fields.
- For the other parameters available in this section, keep the default values.
| Center |
|---|
| Scroll Title |
|---|
| title-alignment | center |
|---|
| title | Figure - SNMP authentication settings for InfiLINK 2x2, InfiMAN 2x2, InfiLINK Evolution, InfiMAN Evolution |
|---|
|  |
|
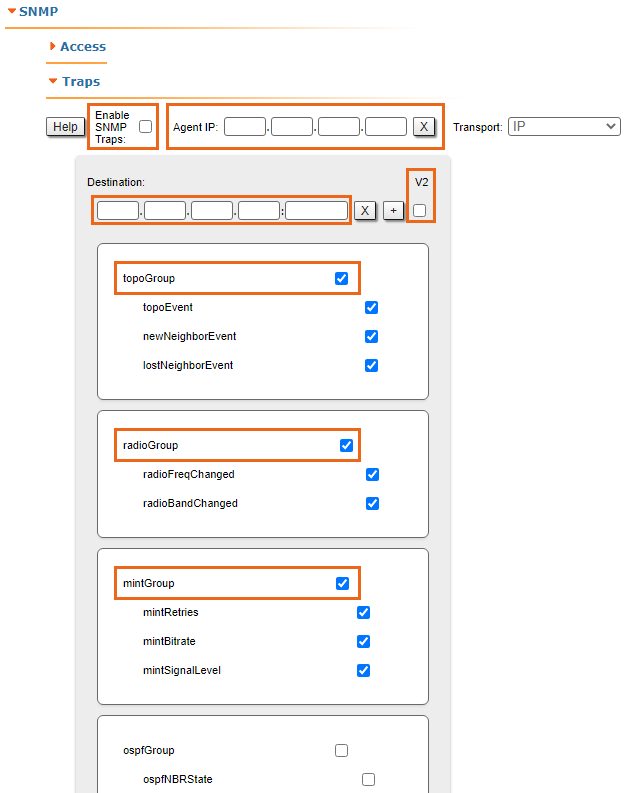
Go to the "Traps" section where the following fields are available:
- "Enable SNMP Traps" - enable/disable traps. Check this flag.
- "Agent IP" - enter the device's IP address.
- "Destination" - the NEXT IP address and the UDP port, through which the polling subsystem receives notifications (by default it is port 162):
- "V2" - enable/disable SNMP v2. Check this flag.
- "Traps groups" - check flags for all the trap groups, that should be sent by the device.
| Center |
|---|
| scroll-title |
|---|
| title-alignment | center |
|---|
| title | Figure - SNMP Traps configuration for InfiLINK 2x2, InfiMAN 2x2, InfiLINK Evolution, InfiMAN Evolution |
|---|
|  |
|
To complete the setup, click on the "Apply" button.
...
- Set the "Start SNMP" flag to enable the SNMP Agent.
- Uncheck the "Version 1 enable" flag to disable the SNMPv1 and v2c versions, which is enabled by default.
- Click the "Add SNMP v3 user" and enter the authentication data for accessing the network node via SNMP in the "Username" and "Password" fields.
- For the other parameters available in this section, keep the default values.
| Center |
|---|
| Scroll Title |
|---|
| title-alignment | center |
|---|
| title | Figure - SNMP authentication settings for InfiLINK XG, InfiLINK XG 1000 |
|---|
|  |
|
...
- Enable SNMP Traps by checking "Enable SNMP traps" flag.
- Enter the device's IP address.
- Click the "Configure SNMP traps and destinations" button and in pop-up window fill in the followinf fields:
- "Destination address" - the NEXT IP address.
- "v2c" - enable/disable SNMP v2. Check this flag.
- "Traps groups" - check flags for all the trap groups, that should be sent by the device.
| Center |
|---|
| Scroll Title |
|---|
| title-alignment | center |
|---|
| title | Figure - SNMP Traps configuration for InfiLINK XG, InfiLINK XG 1000 |
|---|
|  |
|
...
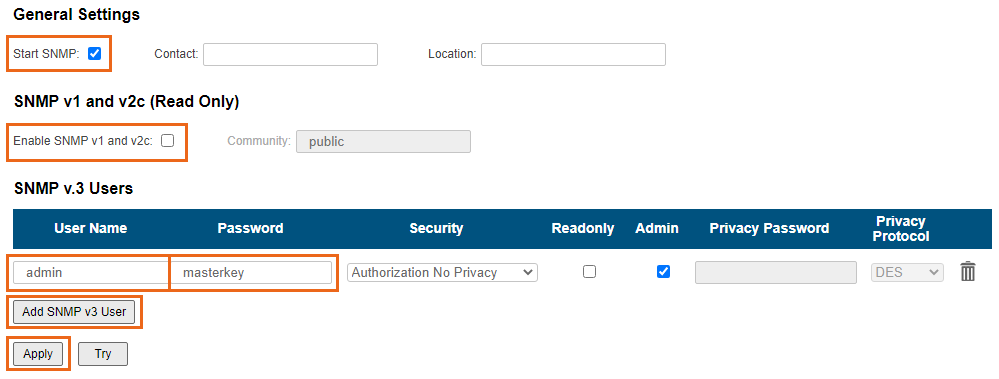
- Enable SNMP agent by activating the corresponding switch.
- Enable SNMP v1 and v2c versions by activating the corresponding switch.
- Enter the community name the set in NEXT to the Community fieldflag.
- Uncheck the "Version 1 enable" flag to disable the SNMPv1 version, which is enabled by default.
- Click the "Add SNMP v3 user"
| Center |
|---|
| Scroll Title |
|---|
| title-alignment | center |
|---|
| title | Figure - SNMP authentication settings for Quanta 5, Quanta 70 |
|---|
| 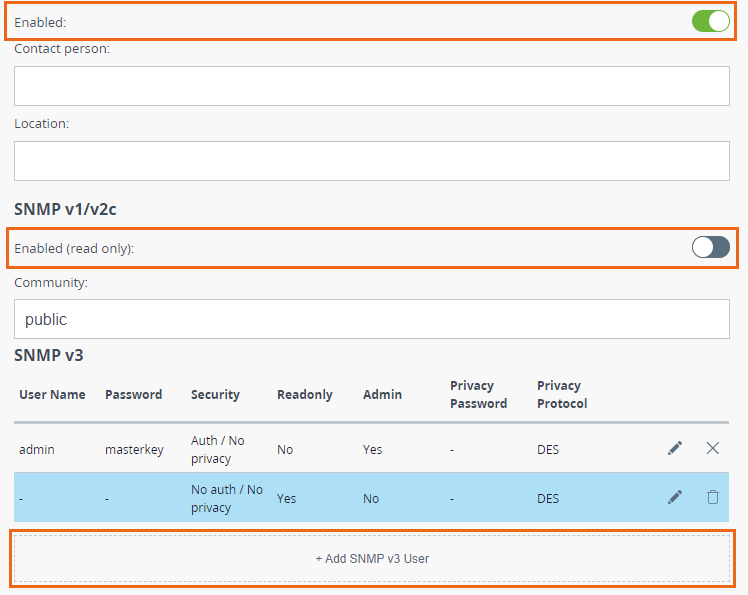 Image Added Image Added |
|
- Select the "Auth/No privacy" mode
- Enter the authentication data for accessing the network node via SNMP in the "Username" and "Password" fields.
- For the other parameters available in this section, keep the default values.
| Center |
|---|
| Scroll Title |
|---|
| title-alignment | center |
|---|
| title | Figure - SNMP v3 settings for Quanta 5, Quanta 70 |
|---|
| 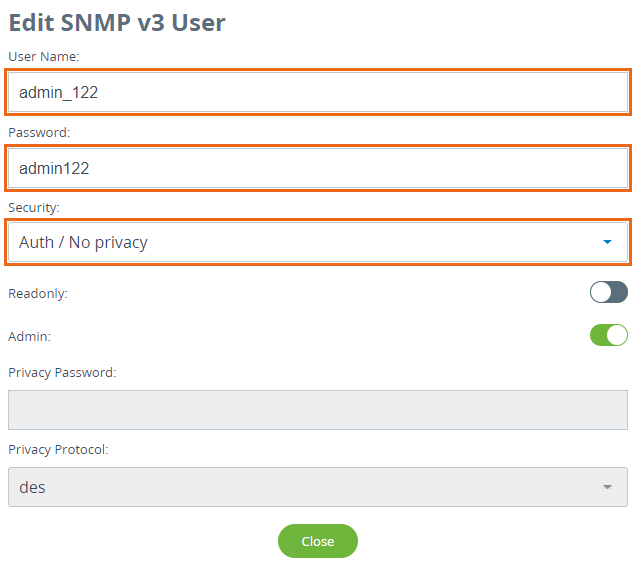 Image Added Image Added |
|
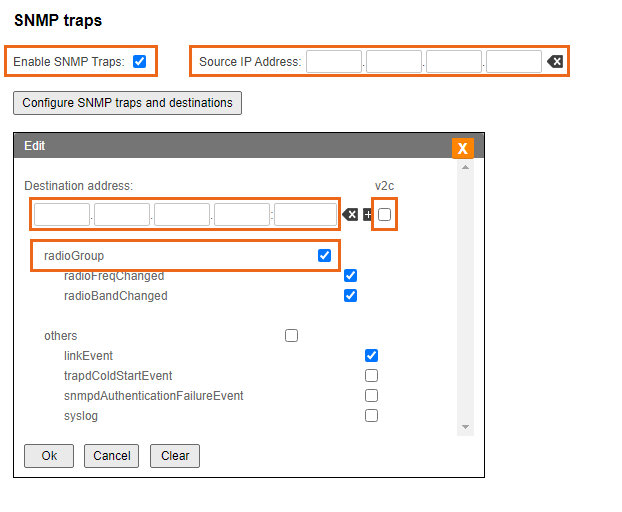
In order to configure SNMP traps go to the "Traps" section and perform the following steps:
- Enable SNMP Traps by checking "Enable SNMP traps" flag.
- Enter the device's IP address.
- Click the "Configure SNMP trap" button
| Center |
|---|
| Scroll Title |
|---|
| title-alignment | center |
|---|
| title | Figure - SNMP traps settings for Quanta 5, Quanta 70 |
|---|
| 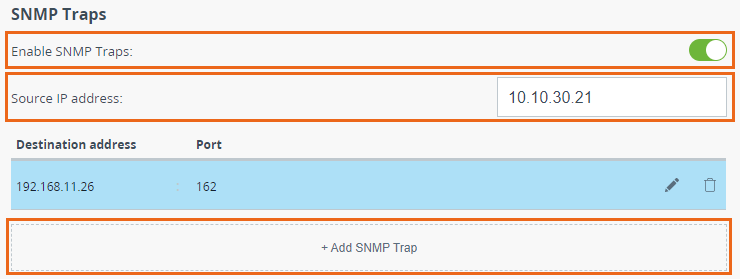 Image Added Image Added |
|
- In pop-up window fill in the followinf fields:
- "Destination address" - the NEXT IP address and port.
- "Traps groups" - check flags for all the trap groups, that should be sent by the device.
| Center |
|---|
| scroll-title |
|---|
| title-alignment | center |
|---|
| title | Figure - SNMP authentication trap settings for Quanta 5, Quanta 70 |
|---|
|  Image Removed Image Removed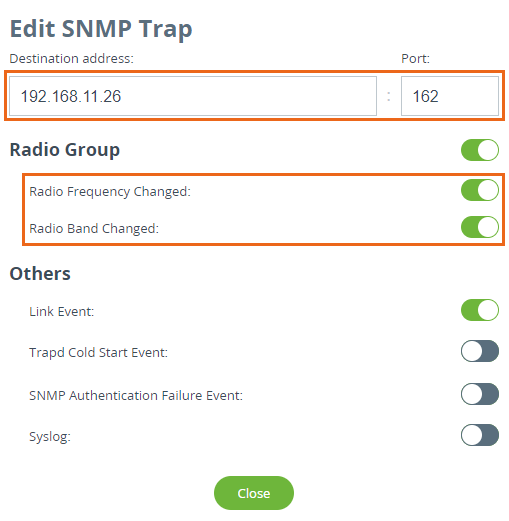 Image Added Image Added |
|