help command
The command displays system commands information.
Syntax:
help
This command displays the list of all the device’s commands. It is executed automatically, if the user types an unknown command.
system command
The command is used to review and update system parameters.
Syntax:
system [arguments]
Command arguments
- system name [system_name]
Assigns new user name specified by system_name parameter. If the parameter is not specified, the current system name will be displayed.
Example,
system name revolution
- system location [string_describing_system_location]
Optional character string describes the system location; used in SNMP protocol.
Example,
sys location On the Carlson’s rooftop
- system user <user-name>
Assigns a name under which the system administrator enters the router from the console or remotely, using telnet/http.
Example,
system user root
- system password <password>
Sets the system administrator's password.
Example,
system password qwerty
- system gpsxy [E|W]XX.XXXXX [N|S]YY.YYYYY
Sets the geographical coordinates of the device (longitude, latitude).
Example,
system gpsxy 60.40056 56.82857
- system guest key-word-or-phrase
Specifies a keyword for entering a guest mode. The keyword is entered as a login, any password may be used. While in the guest mode, you cannot modify the router's configuration parameters, neither security-related parameters.
Example,
system guest for_members_only
ВНИМАНИЕ
To disable the guest mode, the command without specifying a keyword should be used:
system guest
- system prompt any-word
Replaces the prompt on the screen with the given any-word of a maximum length of 16 characters. The resulting prompt will look as "Prompt#ttyN>".
Example,
system prompt MyHost
- system useAAA
Instructs the unit to turn on RADIUS based authentication for accessing the management interface. To use the authentication the AAA module should be running (refer to chapter 19). Remember that the AAA authentication method has the highest priority and local login database is used only in case when the required account is not found on the RADIUS server.
If there is no local user account the management interface will be accessible with any credentials even if the AAA authentication is turned on.
- system [no]indicators
Enables/disables LED status indicators on the unit case in order to mask the active device.
- system [no]fastroute
Enables/disables the fast routing mode. In this mode the router becomes invisible for traceroute network tracing procedures, while still performing all routing functions. It is not recommended to enable the fast routing mode simultaneously on several devices connected to the same cable Ethernet segment, because this may produce a tempest of IP packets.
- system uptime
Displays the duration of time elapsed since the system's last reset.
- system OfficialAddress IP-address
Sets the IP-address which will be used as a source IP-address in all outgoing connections of the unit.
- system version
Displays the software version.
- system log [on|off][IP_address][-][show][clear]
Manages the system log operation. The optional IP_address parameter specifies the UNIX host where the system log is located to which messages are directed under the standard syslog protocol. The command has the following options:
- "on" - display messages on the current console
- "off" - stop displaying messages on the console
- "-" - disable logging on the remote host
- "show" - show the system log listing (the latest message displayed on the bottom line; message time for every message expressed in seconds/milliseconds back from the current time)
- "clear" - clear the system log
- "[no]filter" – this option removes neighboring identical lines from system log leaving only one copy of each message and counts their recurrence (enabled by default)
- system factorypassword [single|otp]
Each unit has its unique factory access password that can be obtained via the tech-support. Once obtained this password stays the same for each factory login attempt. Setting the unit to otp mode tells it to ask for a new password each time the factory login is given (the unit will provide different sequences, that should be submitted to the tech-support in order to obtain a new password). Whenever the unit is set to single mode again, its unique factory access password is restored.
- system icmplimit XX
This command sets the limit to the number of out coming ICMP packets per second (0 by default, no limitation applied). It helps to avoid the device reboot while network scanning programs are working. Being set to 0 all limitations are turned off.
- system [no]sendredirects
Enables (disables) the system to send icmp redirect messages for the packets source suppression if routing is incorrectly configured.
- system [no]dropredirects
Enables (disables) the system to send icmp redirect messages for routing tables updating if routing is incorrectly configured.
- system cpu
Indicates current CPU load (in percent)
- system [no]pager
Enables/disables page splits in the console output.
- system search [seconds]
This command forces all indication to blink for the one type devices search. By default, this mode turns off after 10 seconds.
- system serialCD [no]log [no]trap
Sets the reaction to appearance/disappearance of Carrier Detect (CD) signal on the diagnostics port (console).
- "log" option enables this event to be written into the system log.
- "trap" option enables SNMP-trap messages generation
The message of CD signal disappearance has an oid of 1.3.6.1.4.1.3942.0.103
The message of CD signal appearance has an oid of 1.3.6.1.4.1.3942.0.104
In order to send SNMP messages you need to run trapd service using trapd command (see trapd command).
The current remote log IP-address, if any, may be saved in the configuration file using the config save command.
set command
The command is used for time zone settings manipulations. Starting from 3.36 version of firmware. Do not support automatic summer/winter time switching.
Syntax:
- set TZ TIMEZONE
Example,
set TZ EST+5EDT,M4.1.0/2,M10.5.0/2
set TZ EKT+5
For more details on time zones please visit: http://en.wikipedia.org/wiki/Time_zone
config command (configuration manipulations)
This command is used to view, save, export, and import the router configuration.
Syntax:
config [show | save | clear]
config import | export login:password@host/file
- show
Displays the current configuration of the system. Any change of the system parameters may be immediately viewed using the config show command. The optional parameter may contain a selection of WANFleX commands (abbreviated to their initial letters), as shown in the following examples; only those system parameters will then be displayed which relate to the commands selected.
Examples,
co show route rip
will display parameter configuration for route command and RIP protocols.
co show r !rip
will display parameter configuration for all commands starting with "r" except "rip".
- save
Saves the current system configuration in the router's flash memory for subsequent permanent use. All modifications to the system parameters, if not saved by this command, are valid only during the current session (until the system reset).
- clear
Clears (resets to default) configuration in device flash. To take effect device should be rebooted without saving the configuration.
- export, import
Saves the router configuration on a remote server and reloads it from a remote server. The information is transferred using FTP. The name of the file to or from which the information is transferred. The file name shall be specified in full, in the format of the remote server's file system.
Example,
config export user:secret@192.168.1.1/var/conf/test.cfg
flashnet command (firmware uplaoding)
This command uploads a new version of software.
Syntax:
flashnet get|put login[:password]@host/file [-S src_addr]
- “get” - loads a new software version into the device from a remote server using FTP
- “put” - downloads current software from the device.
File is the name of the file containing the information transferred. The file name shall be specified in full, in the format of the remote server's file system. Host is the IP_address of the remote FTP server.
By default, the sending interface's address is put in the "source address" field of the packets. Using the "-S" option, any other IP address (SourceAddress) may be substituted for this default address.
Example how to update the firmware from InfiNet ftp,
flashnet get ftp:ftp@ftp://91.191.225.246/pub/Firmware/H11/firmware.H11S01v1.6.6.bin
here instead "H11S01v1.6.6" insert the latest firmware version in InfiNet ftp-server, and set:
Username: ftp
Password: ftp
The download process has two phases:
- File uploading into RAM of InfiNet device
- Programming InfiNet device flash memory from RAM firmware image.
Both phases are indicated with symbol ".".
During installation process all system events should be observed in the system journal (command “sys log”). After firmware updating, restart the unit with the command "restart yes"
restart command
The command performs soft router reset.
Syntax:
restart [y]
restart SECONDS
restart stop
Full reset and re-initialization of a router. Equivalent to toggling the power switch off and on. May be used to restore initial configuration after a number of unsuccessful attempts to understand what exactly is done wrong, and after loading a new version of software. With the "y" option, RESTART command is executed immediately, without asking the operator for confirmation.
This command can be used for the postponed re-initialization (after certain number of seconds, e.g. restart 300). This option can be useful in case of dangerous manipulations with device's configuration when there is a risk to lose control over the device. The system will periodically inform the user about the time left to re-initialization by putting the corresponding message to the system log. Repeated call of this command will start the countdown from the beginning. Restart stop command will cancel a postponed re-initialization.
ping command
The command sends test packets.
Syntax:
ping IP [size|-s size_in_bytes] [count|-c count_packets] [source|-S IP]
Sends test packets (ICMP_ECHO_REQUEST) to the given IP-address. It allows estimating the attainability of a host and the destination response time. The command has the following parameters:
- "IP" - the IP-address of the tested host
- "Size/-s" - the test packet length within the range of 10 to 8000 bytes (optional, 64 by default)
- "Count/-c" - the number of the test packets (optional, 5 by default)
- "Source/-S" – sets different source address. By default, the sending interface's address is put in the "source address" field of the packets. Using the "-S" option, any other IP address (SourceAddress) may be substituted for this default address.
Example,
ping 192.168.1.1 size 20 count 7
telnet command
Use telnet protocol to enter a remote host.
Syntax:
telnet IP-address
Sets up a connection with a remote host specified by the IP-address in the terminal emulation mode. The "telnet" command uses transparent symbols stream without any intermediate interpretation; therefore, the terminal type is defined by the terminal from which the command has been executed. To interrupt the terminal emulation session, press "Ctrl/D".
tracert command
The command trace attainability of an IP-node.
Syntax:
tracert [-s SourceAddress] HostAddress
Traces the packet transmission path up to the IP node (host), specified by the "HostAddress" parameter. The command sends packets to the specified host, assigning different values to the "time to live" field in their IP headers, and analyzes "ICMP TIME_EXCEEDED" indications coming from different routers along the path to that host.
By default, the sending interface's address is put in the "source address" field of the packets. Using the "-s" option, any other IP address (SourceAddress) may be substituted for this default address.
Tracing is limited to a path with maximum 30 intermediate IP nodes. Trace packets are 36 bytes long. The trace procedure makes 3 attempts for every intermediate node.
Every trace result contains the IP-address of an intermediate node and the response time (in milliseconds) of every attempt. In addition, it may contain some special symbols corresponding to specific reply codes of the ICMP protocol:
- ! - Port unattainable
- !N - Network unattainable
- !H - Node (host) unattainable
- !P - Inappropriate protocol
- !F - Too long packet
- !X - Access to a node is administratively restricted (filter, proxy etc.)
- * - No reply.
webcfg (Web interface support)
Web-interface support module.
Syntax:
webcfg start|stop
webcfg –lang={en|ru|fr|it|cn}
This command enables/disables Web-interface support on the device. Web-interface allows easy graphical device configuration with the help of a Web-browser.
Example,
webcfg start
Default web-interface locale can be set by using the "–lang" key with the "webcfg" command. Current locale set includes English, Russian, French, Italian and Chinese locales.
rshd command (Remote Shell)
RSH (remote shell) protocol support module.
Syntax:
rshd enable | disable RemoteUSER RemoteHOST LocalUSER
rshd start | stop | flush
The built-in RSH server makes it possible remote command execution using the rsh program. Identification is based on using privileged TCP ports and a list of authorized hosts.
By default, the RSH server is disabled. To start and stop the server, the commands "rshd start" and "rshd stop" are executed. When started, the server ignores requests for command execution until at least one valid system entry is enabled.
A system entry is specified by an "rshd enable" command with three parameters:
- "RemoteUSER" - the name of a remote user (up to 16 symbols)
- "RemoteHOST" – IP-address of a remote host
- "LocalUSER" - the name of a local user (up to 16 symbols).
A request for command execution is serviced only if for all three parameters it specifies the values corresponding to a valid entry.
Up to 6 independent entries may be defined.
The name of a local user is in no relation with the WANFleX main authorization system; it may be considered simply as a keyword.
To disable an entry, an "rshd disable" command is executed with parameters defining that entry.
The "rshd flush" command clears the "rsh" server configuration.
The RSH server may be conveniently used e.g. for periodic reading of a router statistics:
rsh -l mysecretuser RWR.domain.ru ipstat get
Example,
rshd enable admin 195.38.44.1 mysecretuser
rshd enable root 195.38.45.123 mysecret2
rshd start
SSH protocol support
SSH (Secure Shell) protocol allows secure remote management of network devices. Its functionality is similar to Telnet protocol but, as opposed to Telnet, SSH encodes all protocol messages/datagrams including transmitted passwords. Moreover, SSH is a flexible protocol that allows requiring multiple forms of authentication for access and choosing different encoding algorithms.
For using SSH protocol SSH Server and SSH Client is needed. SSH Server accepts connections from client hosts (SSH Clients), performs their authentification and start serving the authorized clients. SSH Client is used for access and management of the remote device.
InfiNet Wireless devices has built-in SSH Server and SSH Client functionality.
sshd command (SSH Server)
Built-in SSH Server (SSH daemon) configuration is performed using “sshd” command.
Syntax:
sshd -window=SIZE
sshd -keepalive=TIME
sshd -banner=on | off
sshd -log-level={emerg | alert | crit | error | warning | notice | info | debug | LEVEL}
sshd -algo-list
sshd -kex-algos=ALGO-LIST
sshd -hostkey-algos=ALGO-LIST
sshd -cipher-algos=ALGO-LIST
sshd -hash-algos=ALGO-LIST
sshd -comp-algos=ALGO-LIST
sshd -auth-methods[=AUTH-METHODS-LIST]
sshd start
sshd stop
sshd newkeys
sshd pub[key] {sh[ow] | cl[ear] | de[lete] N}
sshd pub[key] {in[stall] | im[port] [LOGIN[:PASSWORD]@]HOST/FILE} [COMMENT]
By default, the SSH Server is disabled. To start/stop the server “sshd start”/ “sshd stop” commands are executed.
When first-time started SSH Server generates DSS and RSA Host Keys to be used for public key based authentication of the SSH Server. Compulsory Host Keys re-generation is possible at any time by typing “sshd newkeys” command.
When started, SSH Server accepts authorization requests from SSH Clients.
Access to the device via SSH protocol may be limited by using "$ACLOCAL" access control list. When "$ACLOCAL" list is configured on the device SSH Server rejects all connection attempts from SSH Clients with IP-address or networks that are not present in the list. More information about "$ACLOCAL" list can be achieved in Access Control Lists section of this manual.
The following SSH Server options are available for management:
- "-window=SIZE" - allows changing SSH Server internal receiving window size in bytes. SSH Server window size defines maximum allowed bandwidth for “SSH Client - SSH Server” data channel. By default, SSH Server window size is 24576 bytes.
- "-log-level={emerg | alert | crit | error | warning | notice | info | debug | LEVEL}" – allows choosing logging levels of the SSH Server service information that will be written into the system log (to manage system log please use “sys log” command). Different levels of logging can be chosen by “emerg”, “alert”, “crit”, “error”, “warning”, “notice”, “info”, “debug” parameters or specified by the number of the needed level (from 0 to 7) using numeric “LEVEL” parameter. By default, “info” (6th level) is chosen.
- "-keepalive=TIME" - sets session activity check duration period in seconds. By default server doesn’t make activity check (“0” value).
- "-banner=on/off" – shows/hide IW WANFleX SSH login banner.
Options for SSH algorithms management:
- "-algo-list" – shows a list of all available SSH algorithms for key exchange (kex), authentification (host key), data encoding, data verification (hash) and data compression (compress)
- "-kex-algos=ALGO-LIST" - allows choosing kex algorithms from the list of algorithms (-algo-list) to be used in SSH key exchange process
- "-hostkey-algos=ALGO-LIST" - allows choosing host key algorithms from the list of algorithms (-algo-list) to be used in SSH Server-Client authentification process
- "-cipher-algos=ALGO-LIST" - allows choosing cicpher algorithms from the list of algorithms (-algo-list) to be used in SSH data encoding
- "-hash-algos= ALGO-LIST" - allows choosing hash algorithms from the list of algorithms (-algo-list) to be used in SSH data verification
- "-comp-algos=ALGO-LIST" - allows choosing compression algorithms from the list of algorithms (-algo-list) to be used in SSH data compression.
Authentication of SSH Clients
By default, SSH Clients are authorized by SSH Server after typing a valid password. However, password authentication may be not enough to provide the needed security level. InfiNet Wireless devices have several built-in SSH authentication methods that are managed by “sshd pubkey” and “sshd -auth-methods” commands.
“Sshd pubkey” command allows enabling public key based authentification of SSH Clients. In the Public key authentication mode SSH Server authorize SSH Client bypassing password login procedure. This mode is enabled automatically once a public key of the SSH Client is cached in SSH Server’s registry.
To upload SSH Client’s public key into the SSH Server registry from a remote FTP server use the following command:
sshd pubkey import [LOGIN[:PASSWORD]@]HOST/FILE [COMMENT]
- "HOST" – is an IP-address of the remote FTP server
- "FILE" - is a file containing SSH Client’s RSA/DSS public key in OpenSSH or SSH2 format. If login and password are set on the remote FTP server they should be specified as “LOGIN” and “PASSWORD” parameters in the command syntax.
- "COMMENT" - parameter allows adding a comment to the public key entry in the SSH Server list of clients public keys. By default, a comment with clients IP-address or FTP IP-address from where the key was obtained is added.
The other way to cash SSH Client’s public key in the SSH Server registry is to perform a password authentification of the SSH Client and then type the following command on the SSH Server:
sshd pubkey install [COMMENT]
By doing this SSH Server will save a public key of the connected SSH Client. Usage of the “COMMENT” parameter here is the same as it is in the “sshd import” command described above.
- “Sshd show” command shows SSH Client’s public keys that are registered in the SSH Server list.
- ”Sshd clear” command deletes all the SSH Client’s public keys from the SSH Server.
- ”Sshd delete N” command deletes a certain SSH Client’s public key from the SSH Server list. Parameter “N” – is an index of the key in the list.
- “Sshd -auth-methods” command allows viewing available authentification methods and choosing them for using in authentification process.
To view all available authentification methods please type:
sshd -auth-methods
To choose which of them to use:
sshd -auth-methods=AUTH-METHODS-LIST
Where “AUTH-METHODS-LIST” is a list of authentification methods allowed for using. To enable all authentification methods you can use “all” value for “AUTH-METHODS-LIST” parameter (set by default).
Example,
The following command prohibits using password authentification allowing only “Public key” method.
sshd -auth-methods=publickey
sshc command SSH Client
Built-in SSH Client configuration is performed using “sshc” command.
Syntax:
sshc [options] [LOGIN@]HOST [REMOTE-COMMAND]
- Options:
- window=SIZE
- keepalive=TIME
- compress, -C
- bind-addr=ADDR, -b ADDR
- pubkey-show
- pubkey-new=BITS
- pubkey-clear
- pubkey-export=[LOGIN[:PASSWORD]@]HOST/FILE
- algo-list
- kex-algos=ALGO-LIST
- hostkey-algos=ALGO-LIST
- cipher-algos=ALGO-LIST, -c ALGO-LIST
- hash-algos=ALGO-LIST, -m ALGO-LIST
- comp-algos=ALGO-LIST.
To connect to the remote device (with SSH Server running on it) using SSH Client type the following command:
sshc [options] [LOGIN@]HOST [REMOTE-COMMAND]
- "LOGIN" - a login user name for remote device (maybe omitted when default logging name is used on the remote device)
- "HOST" - an IP-address of a remote device
- "REMOTE-COMAND" - parameters defines a command that should be executed on the SSH Server after successful login.
The following SSH Client «options» are available:
- "window=SIZE" - allows changing SSH Client internal receiving window size in bytes. SSH Client window size defines maximum allowed bandwidth for “SSH Server - SSH Client” data channel. By default, SSH Client window size is 24576 bytes.
- "keepalive=TIME" - sets a frequency of sending compulsory session activity confirmations to the server. This allows not to loose the session to the server when SSH Client leaved unused for a long time period. By default, SSH Client doesn’t send any special activity confirmations (“0” value). Measured in seconds.
- "compress, -C" – enables data compression.
- "bin-addr=ADDR" (short form: -b ADDR) – sets source IP-address of the SSH packets. This source IP-address substitutes the default sending interface's IP-address field of the SSH packets.
“Options” for Public key management:
- "pubkey-new=BITS" – generates new DSS and RSA SSH Client’s public keys. “BITS” parameter should be specified as a key size in bits (possible values: 512-4096). For example, the following command generates RSA and DSS 512 bits public keys:
sshc –pubkey-new=512
- "pubkey-show" – shows generated public keys
- "pubkey-export=[LOGIN[:PASSWORD]@]HOST/FILE" – exports public keys from SSH Client to a file on the remote FTP server.
- "pubkey-clear" – deletes public keys on SSH Client.
Options for SSH algorithms management:
- "algo-list" – shows a list of all available SSH algorithms for key exchange (kex), authentification (host key), data encoding, data verification (hash) and data compression (compress).
- "kex-algos=ALGO-LIST" - allows choosing kex algorithms from the list of algorithms (-algo-list) to be used in SSH key exchange process.
- "hostkey-algos=ALGO-LIST" - allows choosing hostkey algorithms from the list of algorithms (-algo-list) to be used in SSH Server-Client authentification process.
- "cipher-algos=ALGO-LIST" (short form "-c ALGO-LIST") - allows choosing cicpher algorithms from the list of algorithms (-algo-list) to be used in SSH data encoding.
- "hash-algos=ALGO-LIST" (short form "-m ALGO-LIST") - allows choosing hash algorithms from the list of algorithms (-algo-list) to be used in SSH data verification.
- "comp-algos=ALGO-LIST" - allows choosing compression algorithms from the list of algorithms (-algo-list) to be used in SSH data compression.
For compulsory interruption of the SSH Client’s session (for example, if SSH Server is not responding to SSH Client’s requests) please use the following key sequence: <Enter>~. (on the keyboard, firstly, press «Enter» key, then «~» key, then «.» key).
Example,
sshc -C root@1.2.3.4
This command will try to connect SSH Client to the SSH Server located on the host with IP-address 1.2.3.4 under “root” login user name and enable compression of the data flow.
ipstat command (IP-statistics)
IP statistics gathering module.
Syntax:
ipstat enable [incoming|outgoing|full] [detail] [SLOTS] | disable
ipstat clear
ipstat traf [detail] [bytes | total_bytes]
ipstat fixit | fixget | fixclear
ipstat strict | -strict
ipstat add [intf] rule...
ipstat del N
ipstat rearrange [N]
The IP statistics gathering module provides for collecting information on data flows traversing the router, for further analysis and/or for accounting.
Information is accumulated in the router's RAM memory as a series of records having three fields: source address, destination address, number of bytes transferred. By default, only outgoing packets are counted, at the moment they are sent to a physical interface. One record takes 12 bytes.
The maximum number of records is specified by the “SLOTS” numeric parameter of an “ipstat enable SLOTS” command; it shall not exceed the size of memory available. By default the number of records is 1000; typically it's sufficient for recording 15 to 20 minutes of operation of a client unit.
Accumulated information is displayed on the current terminal (or rsh session) using the following commands:
- "ipstat enable [incoming|outgoing|full] [detail] [SLOTS] |" - disable – enables/disables ip statistics gathering. It can allow gathering only incoming/outgoing or full (both) data flows. Detail option switch on detailed ip statistics gathering including ports and protocols information. "SLOTS" option allows setting the maximum number of rows in the ipstat table
- "ipstat clear" - clear accumulated statistical info.
If the record table in the router memory overflows, or if there is not enough memory currently available, an appropriate warning is written into the system log, and further statistical data are discarded. If the “ipstat strict” option has been specified, then at the overflow condition the transit routing is disabled, but the router still responds to any protocol.
To get the gathered statistic info remotely one can use the following commands:
- "ipstat fixit" - dumps the currently collected info from the router's memory into an intermediate buffer. The memory is cleared, and continues receiving info over again
- "ipstat fixget" - shows the content of the dump buffer. This command may be executed any number of times, with no damage to the dumped statistical info
- "ipstat fixclear" - clears the temporary dump buffer.
The listing of statistical info provides:
- time elapsed since the previous "clear" operation
- number of records effectively used, and total record space available
- number of bytes lost due to record memory overflow list of all records.
The "ipstat add [ifname] rule" command makes it possible to filter packets for statistic gathering, taking into account only those packets which satisfy the rule. The syntax of the "rule" parameter is the same as defined in the "ipfw" command description.
The "ipstat del N" command deletes the N-th rule from the list of rules.
The "ipstat rearrange N" command renumbers all the ipstat rules with the given increment (default step is 1).
The "ipstat traf [detail] [bytes | total_bytes]" allows for visually inspecting statistics collection process in real time. Detail option switch on detailed ip statistics gathering including ports and protocols information. "Bytes(/total_bytes)" option sort ipstat output according to the number of transmittered bytes in the moment(/bytes transmitted for the whole period).
This is the script for the reliable device statistics receiving with "rsh" command usage:
#!/usr/bin/perl -w
for(;;)
{
	my $stat;
    do
    {
      $stat = system("rsh -t 30 -n -l root IWR_IP ips fixit >/dev/null");
      if(int($stat) != 0) { sleep(5); }
   } while (int($stat) != 0);
    do
   {
      $stat = system("rsh -t 30 -n -l root IWR_IP ips fixget >stat.tmp");
      if(int($stat) != 0) { sleep(5); }
   } while (int($stat) != 0);
    do
    {
      $stat = system("rsh -t 30 -n -l root IWR_IP ips fixclear >/dev/null");
      if(int($stat) != 0) { sleep(5); }
   } while (int($stat) != 0);
     system("cat stat.tmp >>stat.txt");
    sleep(300);
}
sflowagent (Sflow Agent)
Sflow Agent is a realization of a standard Sflow protocol agent.
Syntax:
Available commands are:
sta[rt] Start Sflow agent
sto[p] Stop Sflow agent
wi[pe] Stop Sflow agent and clean all configuration
add[instance] 'name' Add instance (default 'ipstat')
del[instance] 'name' Delete instance (default 'ipstat')
stat 'name' Show statistics for instance (default 'ipstat')
cl[earstat] 'name' Clear statistics for instance (default 'ipstat')
Available options are:
collector=IPaddress[:port] Set collector address
agent=IPaddress Set agent address (default 0.0.0.0)
maxpacket=size Set maximal datagram size (default 1500)
interval=number Set statistics recieve interval, in seconds (default 5)
datagrams=number Set datagrams per statistics interval (default 100)
rawheader={on|off} Sends original ipV4 headers (default off)
debug={on|off} Puts debug output to log (default off)
version -v Display Version
"Sflow" protocol for monitoring computer networks. It is commonly used by Internet Providers to capture traffic data in switched or routed networks. "Sflowagent" command allows configuration of Sflow agent on the device.
- "sflow sta[rt]" – starts Sflow agent
- "sflow sto[p]" – stops Sflow agent
- "sflow wi[pe]" – stops Sflow agent and clears its configuration
- "sflow add[instance] ‘name’" – adds statistics gathering component (if ‘name’ parameter is not specified then ‘ipstat’ component will be used)
- "sflow del[instance] ‘name’" – deletes statistics gathering component (if ‘name’ parameter is not specified then ‘ipstat’ component will be used)
- "sflow stat ‘name’" – shows statistics for a component (if ‘name’ parameter is not specified then ‘ipstat’ component will be used)
Command output
| Parameter | Description |
|---|---|
| Total flow records |
|
| Total flow samples |
|
| Overflow records |
|
| Overflow count |
|
| Total cycles |
|
| Total datagrams |
|
| Unused datagrams |
|
| Bytes sent |
|
| Lost flow samples |
|
| Lost flow records |
|
| Lost overflow records |
|
- "sflow cl[earstat] ‘name’" – clears statistics for a component (if ‘name’ parameter is not specified then ‘ipstat’ component will be used)
- "sflow collector=IPaddress[:port]" – sets address of a collector that process sflow-packets. Default port is 6343
- "sflow -agent=IPaddress" – sets agent's own address (device)
- "sflow -maxpacket=size" – sets maximum size of a Sflow-packet in bytes. 1472 bytes by default. Upper bound is limited by hardware and operational system capabilities. In case of its exceeding packet size will be decreased to acceptable value.
- "sflow -interval=number" – time in seconds equal to interval with which statistics is delivered from instance. Increasing of this parameter leads to increasing in overall system efficiency but in case of unexpected network activity splash data could be lost. 15 seconds by default.
- "sflow -datagrams=number" - maximum number of datagrams between times of receiving statistics from instance. The increase of this parameter leads to the decrease in datagram average size and increases in theoretical number of delivered statistics data. Reduces the load on the CPU but in the same time reduces overall system efficiency. However, reducing of system efficiency doesn’t happen with low traffic. It is recommended to increase this parameter when decreasing maxpacket parameter and/or when increasing interval parameter. 100 by default. Maximum flow: sflow= datagrams/interval* maxpacket, (Bytes/sec)
- "sflow -rawheader={on|off}" – sends original ipV4 headers in spite of statistics data (off by default). Used for compliance with traffic monitoring programs
- "Sflow -debug={on|off}" – puts statistics information to log.
Example,
ipstat enable full detail 3000 # starting the process of gathering statisticssflow add
ipstat # adding gathering component
sflow -collector=1.2.3.4 start  # starting process of processing the statistics
acl command (Access Control Lists)
Syntax:
acl add $NAME TYPE params...
acl del $NAME [params...]
acl ren $NAME1 $NAME2
acl flush
Possible TYPES: net num
Predefined ACL names: $ACLOCAL - Hosts (networks) permitted to configure the device.
Command description
While network planning you may often need to group similar parameters in lists which can be used for different filters (e.g. ipfw, qm, ipstat). Access control lists (ACL) can effectively solve this problem.
acl add command creates an access list of NAME title and TYPE type. Lists names MUST start with $ symbol and can include up to 7 letters, digits and other symbols excluding spaces and semicolon. At the same time the command can contain several parameters of TYPE type which will be included in the list. If the list with this name has been already created listed parameters will be attached to this list.
- "acl del" command deletes specified parameters from the NAME list. If none of parameters are mentioned all list will be deleted
- "acl rename" command changes list's name from NAME1 to NAME2
- "acl flush" command deletes all lists.
Accepted list types (TYPE):
- net - contains network addresses in dot format
- xxx.xxx.xxx.xxx or xxx.xxx.xxx.xxx/MASK_LENGTH or
- xxx.xxx.xxx.xxx/xxx.xxx.xxx.xxx
Lists of net type optimize their parameters by excluding duplicates and by having the feature that enables bigger networks include smaller networks. For example, if the list contained 1.1.1.1 parameter, when you include 1.1.1.0/24 parameter in the list 1.1.1.1 will be excluded.
Example,
acl add $LIST1 net 10.0.0.0/8 192.168.0.0/16 5.5.5.5
acl del $LIST1 5.5.5.5
Reserved access lists:
- "$ACLOCAL" – reserved list for access limitation to the device via Telnet, FTP, HTTP and SSH protocols. Having "$ACLOCAL" access list in the configuration all attempts to establish a connection with the device from addresses (networks) that are not in this list will be rejected.
Example,
acl add $ACLOCAL net 10.0.0.0/8 192.168.0.0/16
Sntp command
SNTP parameters management.
SNTP support developed in WANFleX lets the system to synchronize the time with configured NTP server using fourth version of SNTP protocol RFC 2030.
Client works in unicast server request mode in certain time range.
Syntax:
sntp [options] [command]
Commands are the following:
- "start" - start service
- "stop" - stop service.
Options are the following:
- "server={ipaddr}" - set sntp server address
- "interval={seconds}" - specify poll interval in seconds
- "debug={on|off}" - enable/disable debug information
Example,
sntp -interval=3600 -debug=on
sntp -server=9.1.1.1 start
Commands:
- start
Make the process of time synchronization active.
Example,
sntp start
- stop
Stop the process of time synchronization.
Example,
sntp stop
Parameters:
The parameters can be set using any sequence with or without the command itself.
- server
Using server parameter you can set the IP-address of your NTP server.
Example,
sntp -server=9.1.1.1
- interval
Using interval parameter one can set the time value (in seconds) defining client's periodicity of NTP server requesting. 3600 by default.
Example,
console> sntp -interval=5000
- debug
This parameter enables/disables printing of debugging information (packets) in the system log of WANFleX OS.
Example,
sntp -debug=on
sntp -debug=off
date command
Date and time management.
This command shows or sets the date and time in WANFleX system. While setting the date and time not only kernel clock is being changed but hardware clock changes its value either (if the device supports this feature).
Syntax:
date [[[[[cc]yy]mm]dd]HH]MM[.ss]]
- "cc" - Century (is added before Year)
- "yy" - Year in abbreviated form (i.e. 89 for 1989, 05 for 2005)
- "mm" - Month in numeric form (1 to 12)
- "dd" - Day (1 to 31)
- "HH" - Hour (0 to 23)
- "MM" - Minute (0 to 59)
- "ss" - Second (0 to 61 - 59 plus maximum two leap seconds).
Example,
date 200402100530.04
Tue Feb 10 05:30:04 2004
date
Tue Feb 10 05:30:10 2004
erp command (Emergency Repair Procedure)
ERP (Emergency Repair Procedure) utility allows restoring lost system password to the device.
Syntax:
erp [options] [command]
- Options:
- "serial <n>" - device serial number
- "code <c>" - special ERP code
- "ip <address>" - IP-address of device’s Ethernet interface
- "mask <mask>" - net mask of device’s Ethernet interface.
- Command:
- "boot" - speeds up device boot
- "reset" - resets device configuration including system user name and password. Serial number and special ERP-code must be specified
- "ifup" - turns up device's Ethernet interface (eth0) and adds IP-address and net mask alias to it. Serial number, IP address and net mask should be specified. If command is not specified, then it's assumed the 'boot' command.
How it works
To do Emergency Repair Procedure one needs two InfiNet Wireless devices. First device is a device which should be repaired (device “a”), second – device on which ERP utility will be run to repair the first device (device “b”). Both of the devices should be connected to the same Ethernet segment via their Ethernet interfaces. Device “b” should have no “switch local tag <х>” option configured on its Ethernet interface.
Procedure:
On the device “b” run ERP utility with “-serial <n>” option, where n – is a serial number of the device which should be repaired (device “a”)
erp –serial <n>
Example,
erp –serial <36696>
ERP will come to “hearing” mode waiting for device “a” to reboot.
- Reboot device which should be repaired (device “a”) by disabling power and enabling it again. For example, by disconnecting and connecting again service cable on the IDU.
- After device “a” is rebooted, on device “b” ERP will show «Sequence» parameter value and serial number of device “a”. Please contact InfiNet Wireless tech support and provide these values.
- In return tech support will give you special ERP-code and new password for device “a”.
On device “b” run the following ERP command:
erp –serial <n> -code <c> reset
n – is a serial number of the device which should be repaired (device “a”)
c – is special ERP-code received from tech support
- Reboot device “a” again
- ERP utility will reset login, password and configuration on device “a” to default (use any characters as default login and password).
Login to device “a” with any non-blank username and password and issue the following command:
config save
- Login device “a” with a serial number as a user name and a new password that was received from tech support.
To change IP-address on Ethernet interface of a device “a” from device “b” without login to device “a”:
erp –serial <SERIAL> -ip <address> -mask <mask> ifup
aaa (access control using RADIUS server)
"aaa" module allows access control configuration on the device using remote RADIUS server.
Syntax:
aaa [options] [command]
- Options:
"auth=ip[:port],secret[,identifier]" - sets parameters to access remote RADIUS server
"remove=ip[:port]" - removes information about a RADIUS server from the configuration of the unit
- "debug={on|off}]" - enables/disables "aaa" module service information system log.
- Commands:
- "start" - start service
- "stop" - stop service
Whenever the debug mode is activated on a device that uses "aaa" access authentication via the remote RADIUS server, the authentication debug info is displayed on the local console to verify the settings.
The output has the following parameters:
| Parameter | Description |
|---|---|
| Request id | Internal unique id of the request |
| Type | Request type, i.e. AccessRequest |
| UserName | The user name sent to the RADIUS server |
| UserPass | The password sent to the RADIUS server |
license
This command manages operations with a license file on the device.
Syntax:
license [options]
- Options:
File-name is the name of the file containing the information transferred. The file name shall be specified in full, in the format of the remote server's file system. IP-address is the IP_address of the remote server.
Examples,
li --export=ftp://ftp_login:ftp_password@192.168.145.1/license_file
li --show
dport
Syntax:
dport BAUD
This command sets a bitrate of the console port. Available values are: 9600, 19200, 38400, 57600, 115200 Bit/sec. Default value is 38400 Bit/sec.
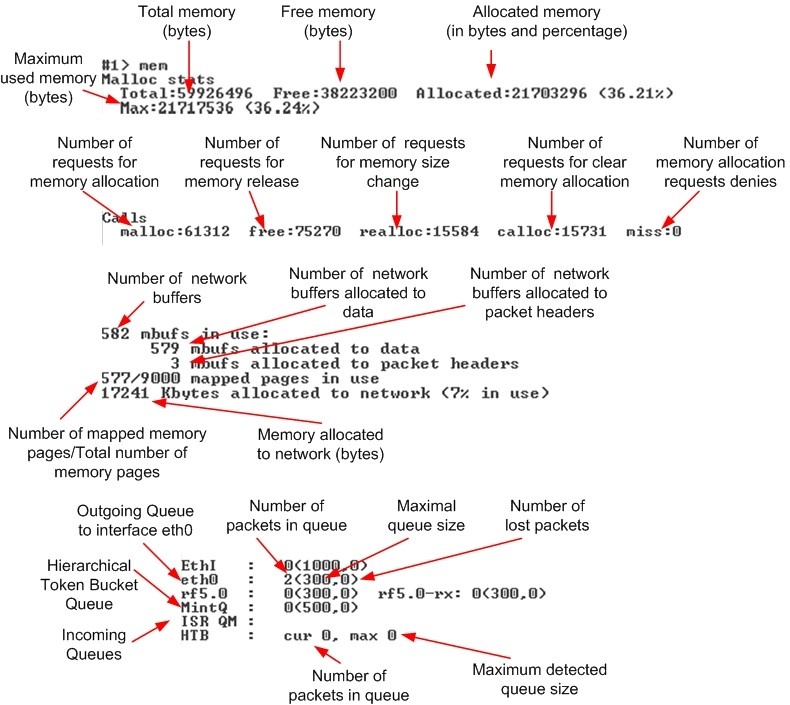
mem
Syntax:
mem
This command show statistics for allocated device memory, network buffers, queues and drops on interfaces. Command output is described in the picture below.
grep command
Grep is a console output filtering utility. It filters a command output with lines containing a match to the given regular expression.
CAUTION
This command is not available on the H01/H02 platforms.
Syntax:
grep [OPTIONS] [-e]PATTERN "command"
or
command | grep [OPTIONS] [-e]PATTERN
- Options:
- "e PATTERN" --regexp=PATTERN
- "i" -- ignore-case
- "v" -- invert-match
- "w" -- word-regexp
- "x" -- line-regexp
- "c" -- count
- "m NUM" -- max-count=NUM
- "n" -- line-number
- "A NUM" -- after-context=NUM
- "B NUM" -- before-context=NUM
- "C NUM" -- context=NUM
Grep utility searches the output of the given command for lines matching the given PATTERN and displays the result.
When used with “-e” option ("-e PATTERN" or "--regexp=PATTERN") allows searching a PATTERN that begins with dash sign (-).
To ignore case distinction between capital and lowercase letters while searching "–i" (or "--ignore-case") option is used.
To perform the invert filtering, i.e. find non-matching lines, "-v" (or "-invert-match") option is used.
To find and display only those lines that matches only the whole world (-w) or line (-x) the corresponding options are used.
To count the number of the result lines (matching or non-matching if used together with "–v" option) "–c" option is used. Result lines themselves are not displayed.
The "–m" option (-m NUM) stops search after the specified number of matching lines.
All the command output lines are index numbered starting from 1. To show the matching lines with their index numbers "–n" option is used.
The "–A NUM", "-B NUM" and "–C NUM" options are used to print the specified number (NUM) of nearby lines after, before or after and before the matching lines correspondingly. When using these options each matching line in the grep output will be printed together with the specified number of the nearby lines separated from other matching entries with a special line (---).