
Successfully pass the free certification exam at IW Academy and become an Infinet Certified Engineer.
This lesson describes basic troubleshooting actions to be taken in case a problem occurs to the wireless link.
List of possible problems:
1.No access to the local unit
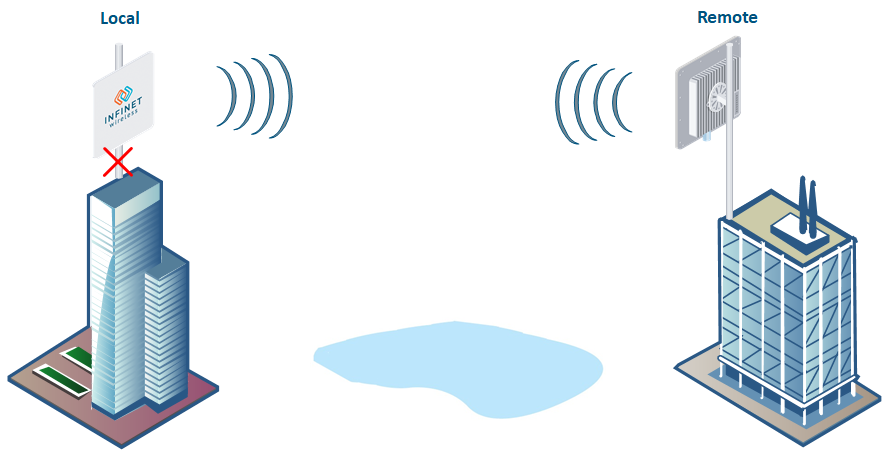
Checking the network infrastructure
Make sure there is connectivity between the control center and the device installation point. If the access is missing only to the Infinet device, further verification must be performed at the installation site.
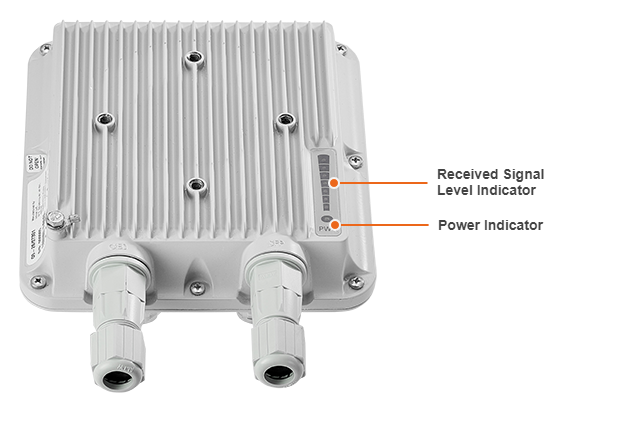
LED indication
Check the power supply to the device: a red light of the "POWER" indicator shows up the device is connected to the electricity mains, a yellow light indicates a wired connection with a speed of 10/100 Mbps, a green light indicates a wired connection to a speed of 1000 Mbps. If there is no power, it is necessary to check the power supply, connectors, the Ethernet cables integrity.
Восстановление доступа
Если индикация показывает наличие электропитания и подключения через интерфейс Ethernet, подключитесь к устройству напрямую в соответствии со схемой ниже. Убедитесь, что на ПК настроен IP-адрес из той же подсети, что и на устройстве. Восстановить IP-адрес и сбросить устройство к заводским настройкам можно посредством утилиты ERConsole.
Если контроль над локальным или удалённым устройством был полностью утрачен, то его можно восстановить с помощью специальной утилиты ERConsole (Emergence Repair Console). Утилита предназначена для восстановления доступа к устройству и сброса настроек на заводские.

Перед началом процедуры восстановления доступа к устройству рекомендуется установить программное обеспечение:
- ERConsole: ftp://ftp.infinet.ru/pub/Utils/EmergenceRepairConsole/ERConsole.zip.
- Java Runtime Environment: http://www.java.com/en/download/.
Отключить антивирусы и сетевые экраны, запущенные на компьютере администратора. Отключить все сетевые интерфейсы, кроме интерфейса Ethernet, к которому будет подключено устройство. В случае если после выполнения вышеперечисленных действий утилита по-прежнему не может обнаружить устройство, следует включить сетевой экран и добавить в него правило, разрешающее входящие подключения по UDP, порт 10009.
Также мы рекомендуем использовать простой неуправляемый коммутатор для подключения между устройством и компьютером. Для активации режима аварийного восстановления необходимо перезагружать устройство, что будет приводить к периодической потере соединения сетевым портом компьютера. Использование коммутатора позволит избежать этого, и сетевой порт будет активен непрерывно. Использование коммутаторов семейства Cisco Catalyst не рекомендуется из-за большой задержки, возникающей при согласовании режима работы сетевого порта.
ВНИМАНИЕ
Команды ERConsole выполняются на устройстве только во время его загрузки. Следовательно, после каждой команды необходимо перезагружать устройство "Инфинет".
Восстановление доступа
Для восстановления доступа к устройству выполните действия, описанные ниже:
- Запустите утилиту ERConsole.
- Отключите устройство, спустя несколько секунд включите его снова.
- Подождите примерно 30 секунд, утилита ERConsole должна получить информацию от устройства. В окне программы будут выведены: серийный номер, количество проведенных циклов сброса настроек устройства на заводские, IP-адрес, сетевая маска и MAC-адрес.
Если устройству уже назначен IP-адрес, настройте на компьютере IP-адрес, принадлежащий той же сети, и подключитесь к веб-интерфейсу устройства.
Назначение IP-адреса
Если устройству уже назначен IP-адрес, выполните следующие действия:
- В окне ERConsole нажмите на кнопку «+», откроется новое окно.
- Введите дополнительный IP-адрес и маску сети, затем нажмите "OK".
- Отключите устройство, через несколько секунд включите его снова. Подождите примерно 30 секунд, пока не будет назначен новый IP-адрес.
- Настройте на компьютере IP-адрес, принадлежащий той же сети, что и вновь назначенный адрес. Теперь вы можете подключиться к веб-интерфейсу устройства. Учтите, что ERConsole не покажет вновь назначенный IP-адрес.
- После подключения к устройству не перезагружайте его, так как дополнительный IP-адрес является временным и не будет назначен после перезагрузки.
Сброс до заводских настроек
В случае необходимости сбросить настройки на заводские выполните действия, описанные ниже.
ВНИМАНИЕ
Если доступ к устройству невозможен из-за забытого имени пользователя или пароля, на него можно попасть используя заводской пароль устройства. Для этого в поле "Имя пользователя" вводится серийный номер устройства, в поле "пароль" – заводской пароль.
- Предварительно получите заводской пароль. Для этого отправьте запрос дистрибьютору, через которого было приобретено устройство, либо в службу технической поддержки компании "Инфинет", если устройство было куплено напрямую. В запросе необходимо будет указать серийный номер устройства и значение параметра "Sequence" (если значение не нулевое).
- С помощью утилиты ERConsole получите IP-адрес устройства, как описано выше.
- В окне ERConsole нажмите на кнопку «+», откроется новое окно.
- Выберите опцию "Reset configuration" и введите заводской пароль в поле "Factory password". Пароль вводится без изменений (с пробелами, как он был получен от службы технической поддержки). Нажмите "ОК".
- Отключите устройство, через несколько секунд включите его снова. Подождите примерно 30 секунд.
- Устройство запустится в специальном аварийном режиме с IP-адресом 10.10.10.1 и маской сети 255.255.255.0. Настройки будут сброшены.
- Войдите в веб-интерфейс устройства, для выхода из аварийного режима выполните перезагрузку кнопкой "Восстановить заводские настройки" в разделе "Обслуживание".
- Настройте новый корректный логин и пароль, сохраните настройки и перезагрузите устройство.
Проверка состояния интерфейса Ethernet
Если удалось получить доступ к устройству, подключившись напрямую, следует установить возможную причину недоступности через сеть. Обратите внимание на статистику проводного интерфейса в разделе "Состояние" web-интерфейса.

В секции "Проводной интерфейс" можно отслеживать статус интерфейса Ethernet и его загрузку трафиком на приём и передачу. В правой части доступна статистика проводного интерфейса, которую можно обнулить нажатием кнопки "Сбросить счетчики". Обратите внимание на количество ошибок FCS, их наличие говорит о нарушении целостности данных при передаче через проводной сегмент. Также проблема может быть вызвана переполнением очереди (порта) или несоответствующим размером кадров (runt и oversize).
Обратите внимание на режим дуплекса на сетевых устройствах, подключенных к беспроводному мосту. Изменить режим дуплекса можно в разделе "Коммутатор" - "Сетевые порты". Рекомендуем выставлять режим автосогласования, предусмотренный стандартом Ethernet. Проблема может возникать при подключении двух устройств с разными настройками режима дуплекса. Например, если одно из устройств работает в режиме автосогласования, а второе в фиксированном режиме "full duplex".

2. No access to the remote unit
The section describes how to test the link when there are no radio communication and no access to the remote unit, but there is access to the local unit.

Step 1: Local unit check
Check if the radio parameters values of the local unit correspond to the settings from the radio planning stage:
- Unit role.
- Center frequency.
- Channel width.
- Maximum transmit power.
- Frame length.
- Guard interval.
- Link ID.
- Access key.
If some parameters have different values, perform the modifications and check the wireless link establishment after unit reboot. In case the wireless link is still down, go on site to the location of the local unit and check the cables and connectors.
Step 2: Remote unit check
In case the wireless link is down even if the parameters were set according with the radio planning results, go on site to the location of the remote unit. Check if it is powered on, power indicator has three possible states: red – the power is on, yellow – 10/100 Mbps wired connection, green – 1000 Mbps wired connection. If there is no power supply please check the AC power supply, the Ethernet cables and connector. Check the RF cables state, in case of devices with external antennas are used. Check if the local connection works by using a laptop or ERConsole.
If the local connection is allowed, after the authentication step in web interface, check all radio parameters by connecting to it using a laptop. The values for the following radio parameters must be the same on both units:
- Link ID.
- Center frequency.
- Channel width.
- Frame length.
- Guard interval.
- Downlink/Uplink ratio.
- Access key.
Step 3: Path profile check
If the wireless link is down after previous steps, check the antennas alliagnment with two teams working simultaneously, one at the remote side and the other one at the local side. Also,redo the radio planning to avoid the situation when coordinates at the initial radio planning stage is different from the current location: huge interferences on the working set of frequencies, Fresnel zone obstruction are possible reasons why the wireless link cannot be established, etc.
Step 4: Report the problem to the InfiNet Wireless support team
If you are unable to identify the cause of the problem, please contact the InfiNet Wireless support team. It is necessary to provide diagnostic card, antenna alignment test results screenshots, the installation points photos, the installation points coordinates.
3. Expected throughput is not met
The wireless link is established but the capacity is less than expected.

Step 1: Local and remote units settings check
Login to both units via web interface, check the availability of the new firmware version. If a newer firmware version is available, proceed with the firmware upgrade in order to benefit of the latest radio features and improvements.
In the "Dashboard" section check the EVM and RSSI parameters values:
- EVM values are significantly differed from the initial, and RSSI values - are not. It may indicate the noise appearance. It is recommended to use the "Spectrum analyzer" tool to determine the noise level on the current channel and to select a new frequency channel.
- EVM and RSSI values are significantly differed from the initial. It is required to check the antennas alignment, cables condition and obstructions in the first Fresnel zone or line of sight.
Proceed to the "Radio" section and check the frame length value, if it is too small, try to increase it. Perform the antenna alignment with built-in tool especially in case of low RSSI and EVM values.
Step 2: Check at the units location site
Further actions should be done on the site of units location. Check the Ethernet connection, as well as the cables integrity. Tighten the connector and check the antennas, as well. Perform proper antenna alignment on site. If after the alignment the EVM level is still low, it indicates the presence of external interference. Try to use another frequency if available or perform a spectrum scanning.
Step 3: Report the problem to the InfiNet Wireless support team
If you are unable to identify the cause of the problem, please contact the InfiNet Wireless support team. It is necessary to provide diagnostic card, antenna alignment test results screenshots, the installation points photos, the installation points coordinates.
4. No data is being transferred
The wireless link is established but no data is being transffered.
Step 1: Local and remote units settings check
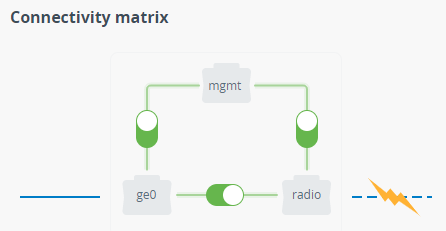
Connect to the unit web interface and check the matrix connectivity in the "Switch" section, ge0 port must be connected with the radio port.
Check the operation status of the ge0 port. Enable the port if it was disabled. In case of using VLANs, proceed to the "Switch" section and make sure that the VLAN configuration is correct, the specific traffic VLAN ID is allowed to pass through the port.

If the port status is "Up" but no packets are received, check the configuration of the equipment which is directly connected.

Step 2: Check at the units location site
Further actions should be done on the site of the units location. Check the Ethernet connector, as well as the integrity of the cables.
Step 3: Report the problem to the InfiNet Wireless support team
If you are unable to identify the cause of the problem, please contact the InfiNet Wireless support team. It is necessary to provide diagnostic card, antenna alignment test results screenshots, the installation points photos, the installation points coordinates.
5. Unit mangement is lost
If the management of the unit is completely lost (of the local and/or the remote one), the ERConsole recovery procedure should be used. ERConsole is a software application created to recover or add a new IP address to the InfiNet Wireless units. Additionally, the ERConsole can be used to reset the InfiNet Wireless units to the factory default configuration.
Software requirements::
- ERConsole: ftp://ftp.infinet.ru/pub/Utils/EmergenceRepairConsole/ERConsole.zip.
- Java Runtime Environment: http://www.java.com/en/download/.
It is recommended to turn off any anti-virus or firewall running on your computer and to turn off all the network interfaces, except the Ethernet interface connected to the same broadcast subnet as the Infinet Wireless unit. If no device can be discovered by ERConsole, turn on the firewall, and add an UDP connection port 10009 as an exception.
We also recommend to use a simple unmanaged switch as intermediary unit between your PC and the InfiNet Wireless unit. It is essential to reboot the InfiNet Wireless unit each time in order to activate the Emergency Repair Protocol on the unit, therefore the switch would prevent your PC Ethernet interface from flapping up and down. Using Cisco Catalyst switches for unit recoverty is not recommended due to a known issue port mode negotiation delay.

NOTE
ERConsole and InfiNet Wireless units exchange information only during the bootup process, therefore each time you need to read the units IP address, to add a new IP or to restore to the default configuration, the InfiNet Wireless unit should be rebooted.
Access to the unit recovery
If you have lost management to your unit, proceed as follows:
- Run the ERConsole.
- Turn off the unit and then turn it on in a few seconds.
- Wait for 30 seconds and the ERConsole screen should receive update from the unit. The serial number, number of unit reset cycles ("Sequence" field), IP address, network mask and MAC adress will be displayed on the screen.

Further recovery depends on whether the IP-address is assigned or not to the unit.
IP address and net mask are assigned
Configure on your PC an IP belonging to the same network and connect to the unit in order to perform the modifications and checking required. If there is no IP, displayed (0.0.0.0), proceed with the next step.
IP address and net mask are not assigned
- Click the "+" button in the ERConsole application and a new window will appear.
In the "New task" window, set the additional IP address and network mask, then click "OK".
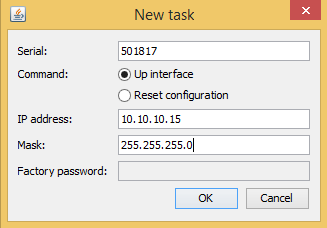
- Turn off and on the unit. Wait for 30 seconds until the IP is assigned.
- Add an IP address from the same network subnet to your PC and access the unit. ERConsole will not show newly assigned IP address.
- Login to the unit using the new IP. Do not reboot the unit until the new configuration has been saved because the additional IP address is temporary.
Restore to the factory default settings
In case you need to restore your unit to the factory default settings, proceed as follows.
NOTE
If the management of the unit is lost due to unknown user name or password it can be restored using factory password. Enter the device serial number to the "Login" field and factory password - to the "Password" field.
- Obtain the factory password. In order to do this, please contact the distributor through whom the unit was purchased, or in case purchasing the unit directly in InfiNet Wireless, send a request to the InfiNet Wireless support team. The request must include the unit serial number and the value of "Sequence" field (if it's non-zero).
- Obtain the unit IP address using the ERConsole as described in the section above.
- Click on the "+" button in the ERConsole application and a new window will appear.
Select "Reset configuration" option and enter the factory password to the "Factory password" field, then click "OK". The password must be entered at the same format as it has been got from the distributor or IW support team (with the gaps).

- Turn off and on the unit and then wait for about 30 seconds.
- The unit will start in a special emergency mode with the IP address 10.10.10.1 and mask 255.255.255.0.
- Login to the unit and use "Restore factory settings" button on the "Maintenance" section to switch off emergency mode.
- Set new login and password, then save the configuration and restart the unit.