Successfully pass the free certification exam at IW Academy and become an Infinet Certified Engineer.
Backup of InfiMONITOR may be needed in order to restore the monitoring data, that has been lost due to fault or other different factors.
Backup system Architecture
InfiMONITOR continuously handles a lot of information coming from wireless units. In this case the backup process creates additional load that may highly increase the time of reaction on changes in wireless network. The backup process is performed on a dedicated server to avoid the negative influence on the monitoring process.
The interaction between backup system and InfiMONITOR is shown on the scheme bellow.

For security reasons the monitoring system must be authorized on the backup server with the special password, that can be changed in the service mode.
Backup and Recovery processes
Let's have a look at backup process from the moment of data appearance till data recovering.
| Phase | Description |
|---|---|
| DB synchronization | Backup server database performs one way synchronization in real time with the InfiMONITOR database. In basic mode synchronization doesn't cause excessive load because it performs continuously, incrementally copying a small amount of new and updated data. But there are two cases when synchronization may be intensive:
|
| Backup Creation | Backup creation is performed on the backup server. Backups frequency is defined by administrator via InfiMONITOR web interface. Copying is performed by file system and occurs almost instantly. |
| Backups Storage | Backup server stores each of backups. The list of backups is available via InfiMONITOR web interface. |
| Backups Rotation | Backups are stored for the period of time set by administrator via InfiMONITOR web interface. The obsolescence control is performed daily. A copy whose creation date exceeds the retention period will be deleted. |
| Recovery | Data restoring from a backup is performed only with a clear InfiMONITOR installation. Administrator should specify the credentials for accessing the backup server and select a backup for recovery from the list of backups. During the final installation phase, InfiMONITOR will download the backup from the backup server, and then apply it. |
Backup Server Installation
System requirements
The backup system is sensitive, first of all, to the amount of disk space. The CPU load and the amount of used RAM are relatively small, so the requirements for them are significantly lower than those of InfiMONITOR. To determine the necessary amount of disk space, the following indicators should be guided:
- The amount of used disk space in "Databases" section ("Disk space"). We recommend to allocate at least twice the amount for the backup server.
- Backups frequency.
- Backups period of time storage. The longer the copies are stored, the more disk space may be required.
Below are the recommended system requirements for the platform depending on the devices number to monitor by the InfiMONITOR:
| Devices | Up to 2 000 | Up to 10 000 |
|---|---|---|
| CPU | Intel Core i3 3 GHz, 4 cores level | Intel Core i3 3 GHz, 6 cores level |
| RAM | from 6 Gb | from 8 Gb |
| HDD | from 500 Gb | from 1 TB |
| Additional | Hardware controller in RAID 10 level |
CAUTION
Mandatory requirement to CPU it must be x64 architecture.
In order to install InfiMONITOR on the virtual platform server's CPU must support hardware virtualization enabled in the BIOS.
Installation
Performed on a separate server or virtual machine (VMware ESXi, Microsoft Hyper-V, Citrix XenServer are supported). For installation you should use the standard distribution kit of the InfiMONITOR monitoring system.
WARNING
Backup functions is available starting with the InfiMONITOR 2017.3 version.
Step 1 - Booting
- Installation on a virtual machine - connect ISO image with InfiMONITOR distributive, set your BIOS to boot from CD.
- Installation on a dedicated server - insert CD or USB flash drive with InfiMONITOR, set your BIOS to boot from the appropriate device.
Step 2 - Starting Installation
Start the server or virtual machine. Select "Install InfiMONITOR Backup Server" that apperas in the installation menu after booting.
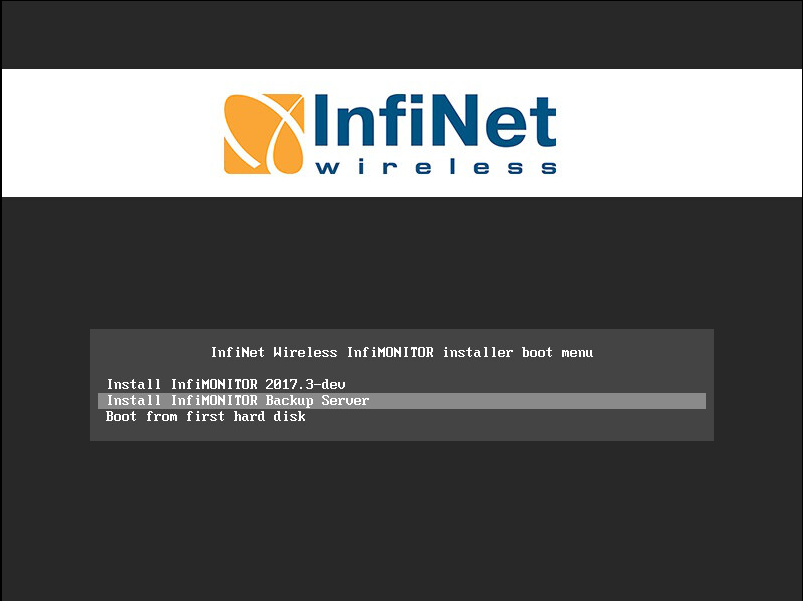
The next steps are similar to the InfiMONITOR installation process and described in the section "Installation of InfiMONITOR".
Configuration
NOTE
Please perform the Firewall configuration for the backup server to work properly. In the InfiMONITOR firewall configuration open the 50001/ tcp port for interaction with the backup server, in the backup server firewall configuration open the 2121/tcp, 30000-30009/tcp, 50000/tcp ports for interaction with the InfiMONITOR.
After the installation is complete and the backup server is started, you must set up the connection between InfiMONITOR and backup server. Go to the "Settings" section of InfiMONITOR web interface, in "Backups" specify the backup server IP address or domain name as well as the password for authorization and click the "Apply" button.

NOTE
By default the authorization password is set to "backup", but we strongly recommend to change it right after the backup server is installed. This can be done in the backup server service mode.
In case of successful connection to the backup server the status will be changed and settings will be available.
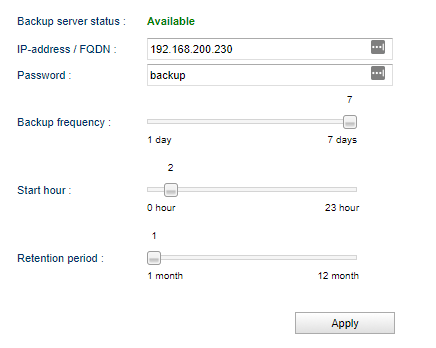
- Backup frequency - the frequency of backups with an accuracy of 1 day. The minimal frequency - 7 days.
- Start hour - the hour at which the backup process begins.
- Retention period - the period of backups storage with an accuracy of 1 month. The maximum storage time is 12 months.
NOTE
If the amount of free disk space on the backup server is less than 10 GB or less than 10% of the total volume, then regardless of the value of "Backup retention period", the oldest backups are automatically deleted. This procedure is designed to prevent the complete exhaustion of disk space.
The amount of occupied disk space on the backup server can be determined using a special indicator in the InfiMONITOR web interface.

Status control
Status
The backup server status is displayed both in InfiMONITOR web interface and in the backup server service mode. The following statuses are exist:
- Not connected - the connection between InfiMONITOR and backup server is not established.
- Initializing - the InfiMONITOR services are prepared for backup. In general this status is set only at the first connection of InfiMONITOR to the backup server.
- Available - the connection between InfiMONITOR and backup server is established, backups are being performed.
List of backups
In the InfiMONITOR web interface you may see the last backup creation date and time, and also the list of all backups that are stored on the backup server.

NOTE
The list of all backups is available via FTP. The standard username "backup" and password for authorization, which is used when connecting InfiMONITOR to the backup server, should be used for authorization.
Backup Server Managing
Service mode
The backup server is managed exclusively in the service mode, which is accessed directly on the server.
By default, the service mode displays information about the current status of the backup server:
- Backup server status.
- Date and time of the last created backup.
- The IP address of the serviced InfiMONITOR server.
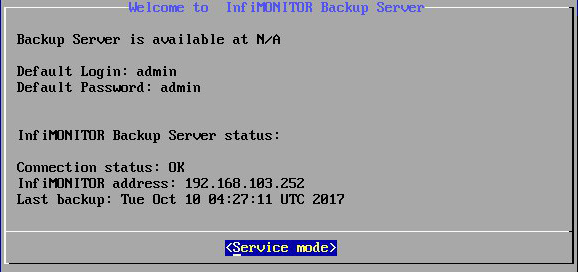
Right after authorization in the service mode, you will be able to access the menu, which includes the following items:
- Network settings - the network adapter settings are similar to the InfiMONITOR service mode.
- InfiMONITOR Instance - the authorization password for connection between InfiMONITOR and backup server.
- Change admin password - change the password for authorization in the service mode.
- Reboot InfiMONITOR Backup Server - reboot the backup server.
Upgrade
The backup server upgrade is performed automatically and sequentially, first InfiMONITOR, then backup server.
The monitoring system downloads update packages both for the components of InfiMONITOR and backup server. After InfiMONITOR components update completion the monitoring system publishes update packages for the backup server and tells it to perform the update. This guarantees systems compatibility which is a key factor of a correct backup server functioning.
Restore from a backup
The recovery procedure from backup is performed during the installation phase of InfiMONITOR. The installer must have network access to the backup server since the backups will be downloaded from it. Recovery includes the following steps:
Perform InfiMONITOR installation in recovery mode.
Reboot the server after the installation is complete.
Run the recovery program.
Connect to the backup server and get a backup.
Data recovery.
InfiMONITOR launching.
NOTE
Recovery from backup is possible only for the same version of InfiMONITOR for which this backup was created.
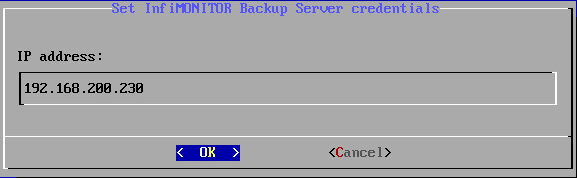
Step 1 - Launching the recovery program
Initiate the InfiMONITOR installation procedure as described in the section Installation of InfiMONITOR.
Select the type of installation "Restore from backup".
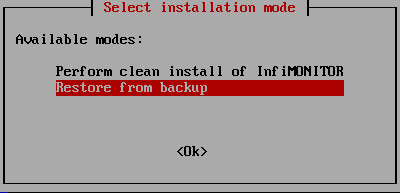
The next steps are similar to the InfiMONITOR installation process and described in the section Installation of InfiMONITOR.
After installation is complete the recovery program will be started. In this program you should specify the credentials to connect to the backup server.
Step 2 - Recovery program
Set the backup server IP address.
Set the backup server authorization password.
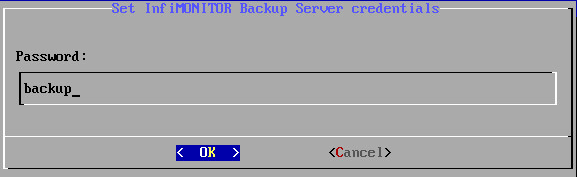
After connection to the backup server is established the list of backups will be shown, select one of them.

Complete the recovery by rebooting the server.
