NEXT polls the network nodes using SNMP. This means that in order to perform management and monitoring, an SNMP agent must be started and configured on each node.
By default, the "SNMP Agent" and the "SNMP Trap" notifications are disabled. To perform monitoring using NEXT, perform the necessary settings in the device's configuration: enable SNMP Agent and configure the SNMP Traps.
This article provides instructions to configure devices of the each Infinet Wireless families:
| Note |
|---|
|
The NEXT monitoring system supports "authNoPriv" protected mode only. |
InfiLINK 2x2, InfiMAN 2x2, InfiLINK Evolution, InfiMAN Evolution families
There are 2 ways how to change the configuration:
- Using the Command Line Interface (faster way).
- Using the Web GUI.
Configuration via CLI
A detailed description of the WANFleX OS commands is available in the snmpd command (SNMP daemon) article. Connect to the device using Telnet or SSH and enter the following commands (the words USERNAME and PASSWORD must be replaced with the actual values):
| Code Block |
|---|
|
snmpd user USERNAME add pass PASSWORD security authNoPriv accessRights readWrite class admin |
Enable the SNMP Agent and save the configuration:
| Code Block |
|---|
|
snmpd start
config save |
To enable and configure the SNMP Agent simultaneously for all the CPE devices connected to a BS (including the BS itself), run the following commands at the Base Station:
| Code Block |
|---|
|
mint rf5.0 rcmd -all -self "snmpd user USERNAME add pass PASSWORD security authNoPriv accessRights readWrite class admin"
mint rf5.0 rcmd -all -self "snmpd start"
mint rf5.0 rcmd -all -self "config save" |
To enable SNMP Traps simultaneously for all the CPE devices connected to a BS (including the BS itself), run the following commands at the Base Station: (replace "IP ADDRESS" with the IP address assigned to NEXT):
| Code Block |
|---|
|
mint rf5.0 rcmd -all -self "trapd start"
mint rf5.0 rcmd -all -self "trapd dst IP ADDRESS:162/v2"
mint rf5.0 rcmd -all -self "trapd type topoGroup enable"
mint rf5.0 rcmd -all -self "trapd type radioGroup enable"
mint rf5.0 rcmd -all -self "trapd type mintGroup enable"
mint rf5.0 rcmd -all -self "trapd type ospfGroup enable"
mint rf5.0 rcmd -all -self "trapd type linkEvent enable"
mint rf5.0 rcmd -all -self "trapd typetrapdColdStartEvent enable"
mint rf5.0 rcmd -all -self "trapd type snmpdAuthenticationFailureEvent enable"
mint rf5.0 rcmd -all -self "trapd type syslog enable"
mint rf5.0 rcmd -all -self "config save" |
Configure the agent's IP address on each device (replace "IP ADDRESS" with the IP address of the device):
| Code Block |
|---|
|
trapd agent IP ADDRESS
config save |
Configuration via Web interface
| Note |
|---|
|
You can also use the Command Line section of the web interface to execute the commands described above. |
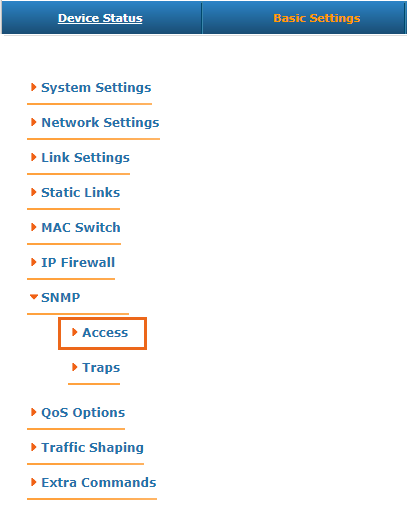
Log in to the device’s web interface. Go to the "Basic settings" page -> "SNMP" to the "Access" section:
| Center |
|---|
| Scroll Title |
|---|
| title-alignment | center |
|---|
| title | Figure - SNMP section |
|---|
|  |
|
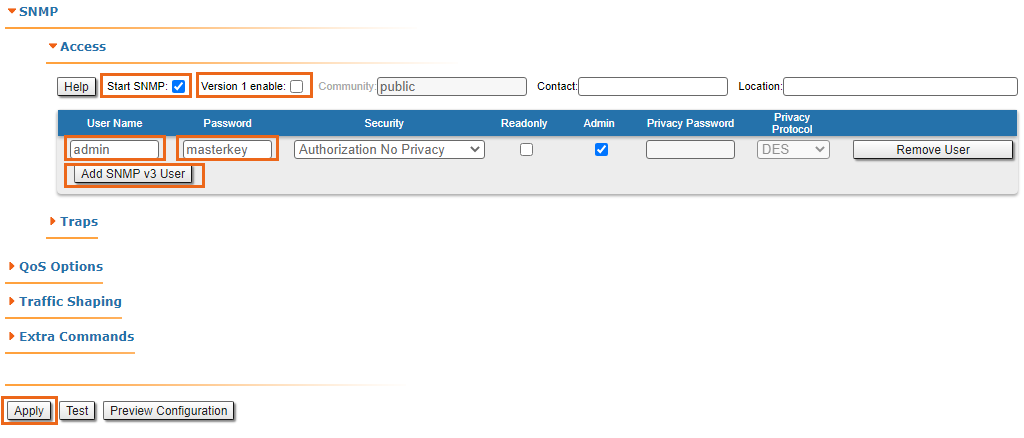
Perform the following steps:
- Set the "Start SNMP" flag to enable the SNMP Agent.
- Uncheck the "Version 1 enable" flag to disable the SNMPv1 version, which is enabled by default.
- Click the "Add SNMP v3 user" and enter the authentication data for accessing the network node via SNMP in the "Username" and "Password" fields.
- For the other parameters available in this section, keep the default values.
| Center |
|---|
| Scroll Title |
|---|
| title-alignment | center |
|---|
| title | Figure - SNMP authentication settings for InfiLINK 2x2, InfiMAN 2x2, InfiLINK Evolution, InfiMAN Evolution |
|---|
|  |
|
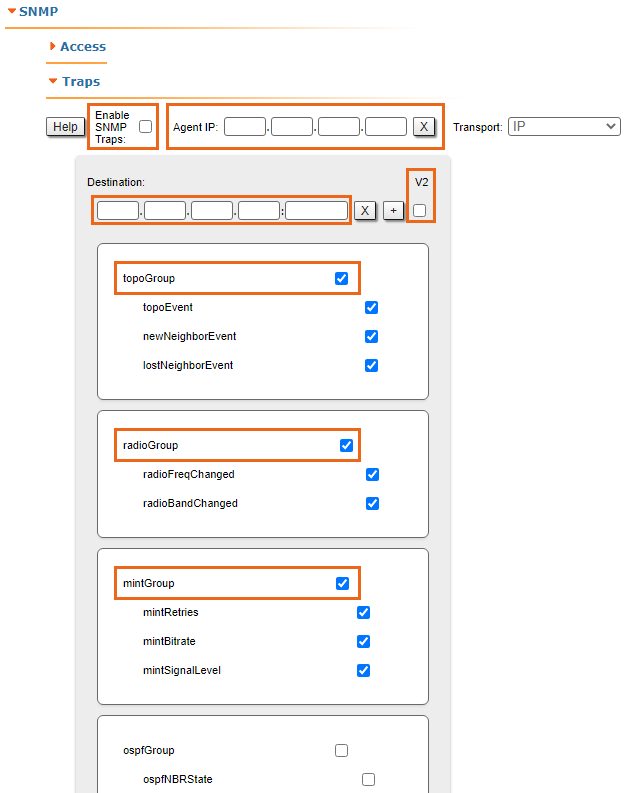
Go to the "Traps" section where the following fields are available:
- "Enable SNMP Traps" - enable/disable traps. Check this flag.
- "Agent IP" - enter the device's IP address.
- "Destination" - the NEXT IP address and the UDP port, through which the polling subsystem receives notifications (by default it is port 162):
- "V2" - enable/disable SNMP v2. Check this flag.
- "Traps groups" - check flags for all the trap groups, that should be sent by the device.
| Center |
|---|
| Scroll Title |
|---|
| title-alignment | center |
|---|
| title | Figure - SNMP Traps configuration for InfiLINK 2x2, InfiMAN 2x2, InfiLINK Evolution, InfiMAN Evolution |
|---|
|  |
|
To complete the setup, click on the "Apply" button.
InfiLINK XG, InfiLINK XG 1000 families
Log in to the device’s web interface. Go to the "SNMP" section.
Perform the following steps:
- Set the "Start SNMP" flag to enable the SNMP Agent.
- Uncheck the "Version 1 enable" flag to disable the SNMPv1 and v2c versions, which is enabled by default.
- Click the "Add SNMP v3 user" and enter the authentication data for accessing the network node via SNMP in the "Username" and "Password" fields.
- For the other parameters available in this section, keep the default values.
| Center |
|---|
| Scroll Title |
|---|
| title-alignment | center |
|---|
| title | Figure - SNMP authentication settings for InfiLINK XG, InfiLINK XG 1000 |
|---|
|  |
|
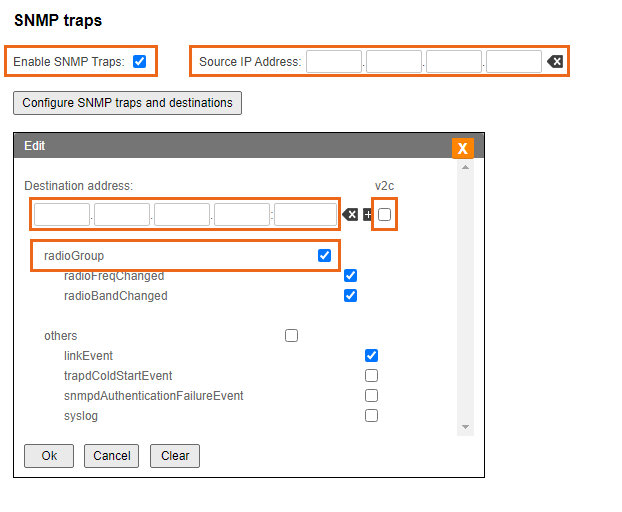
In order to configure SNMP traps go to the "Traps" section and perform the following steps:
- Enable SNMP Traps by checking "Enable SNMP traps" flag.
- Enter the device's IP address.
- Click the "Configure SNMP traps and destinations" button and in pop-up window fill in the followinf fields:
- "Destination address" - the NEXT IP address.
- "v2c" - enable/disable SNMP v2. Check this flag.
- "Traps groups" - check flags for all the trap groups, that should be sent by the device.
| Center |
|---|
| Scroll Title |
|---|
| title-alignment | center |
|---|
| title | Figure - SNMP Traps configuration for InfiLINK XG, InfiLINK XG 1000 |
|---|
|  |
|
Quanta 5, Quanta 70 families
Log in to the device’s web interface. Go to the "SNMP" section.
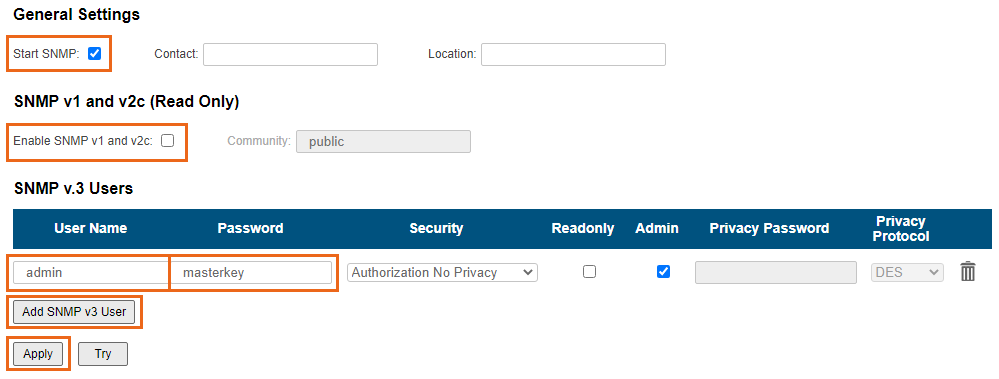
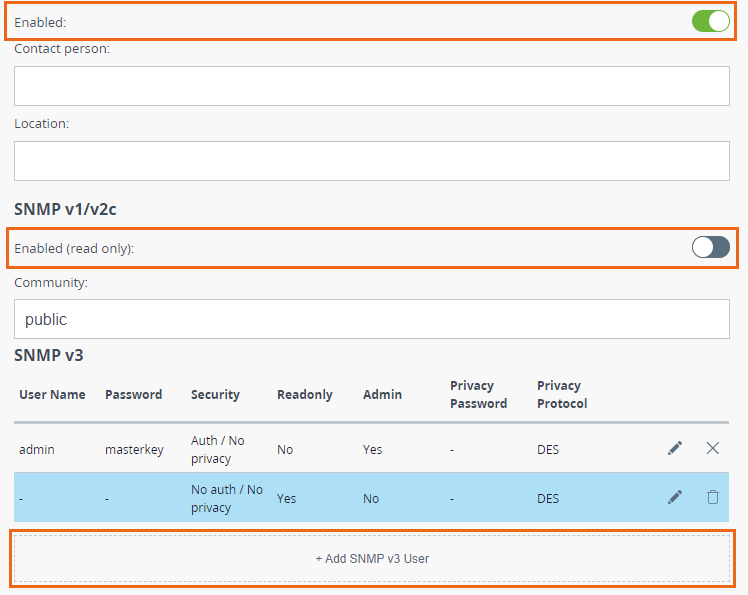
Perform the following steps:
- Enable SNMP agent by activating the corresponding flag.
- Uncheck the "Version 1 enable" flag to disable the SNMPv1 version, which is enabled by default.
- Click the "Add SNMP v3 user"
| Center |
|---|
| Scroll Title |
|---|
| title-alignment | center |
|---|
| title | Figure - SNMP authentication settings for Quanta 5, Quanta 70 |
|---|
|  |
|
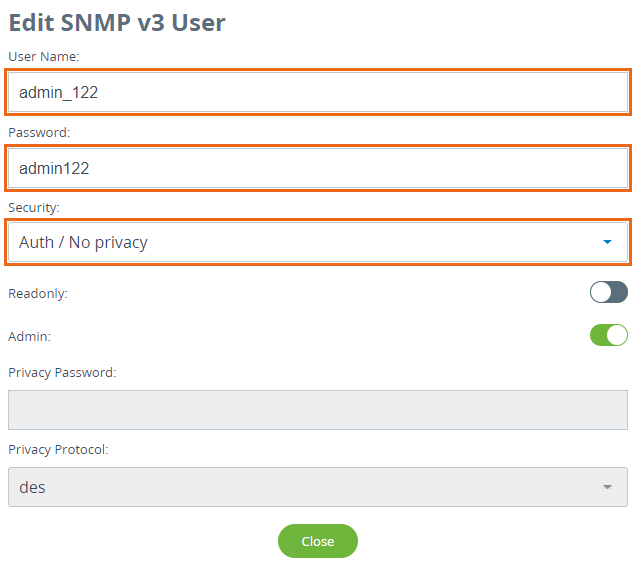
- Select the "Auth/No privacy" mode
- Enter the authentication data for accessing the network node via SNMP in the "Username" and "Password" fields.
- For the other parameters available in this section, keep the default values.
| Center |
|---|
| Scroll Title |
|---|
| title-alignment | center |
|---|
| title | Figure - SNMP v3 settings for Quanta 5, Quanta 70 |
|---|
|  |
|
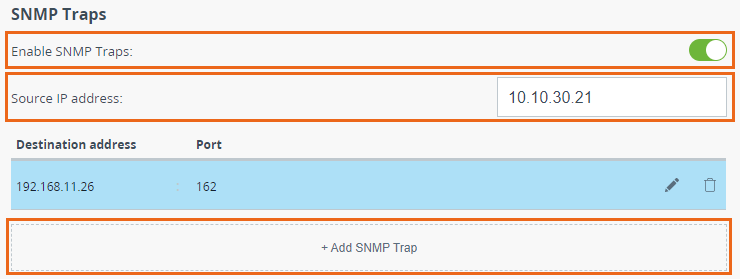
In order to configure SNMP traps go to the "Traps" section and perform the following steps:
- Enable SNMP Traps by checking "Enable SNMP traps" flag.
- Enter the device's IP address.
- Click the "Configure SNMP trap" button
| Center |
|---|
| Scroll Title |
|---|
| title-alignment | center |
|---|
| title | Figure - SNMP traps settings for Quanta 5, Quanta 70 |
|---|
|  |
|
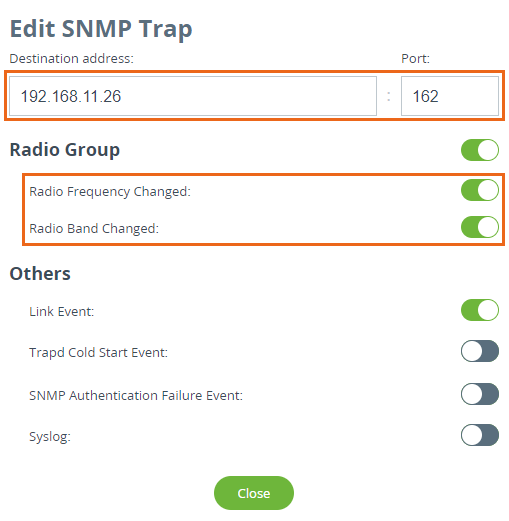
- In pop-up window fill in the followinf fields:
- "Destination address" - the NEXT IP address and port.
- "Traps groups" - check flags for all the trap groups, that should be sent by the device.
| Center |
|---|
| Scroll Title |
|---|
| title-alignment | center |
|---|
| title | Figure - SNMP trap settings for Quanta 5, Quanta 70 |
|---|
|  |
|