...
Click on "Users" at the top menu to go proceed to the user account management section.
By default, the section displays a list of groups and user accounts. For each account, the following values are displayed:
- "Role" - current user role.
- "Name" - user name.
- "Login" - user login.
- "Email" - user email address.
- "Source" - account source:
- NMS - local user account.
- LDAP - account obtained from the directory server using the LDAP protocol.
...
To create a new user group, click on the "Add group" button. A form will appear on the screen containing the following fields:
- "Name" - user group name.
- "Description" - arbitrary group description.
- "Devices groups" - the list of devices groups that will be included in the visibility area of new user group.
- "Users" - the list of user accounts included in the group.
...
In order to be able to delete a user group, it must not contain user accounts. Move all users of the deleted group need to be removed to another group, then select the deleted group and click the "Delete" button.
...
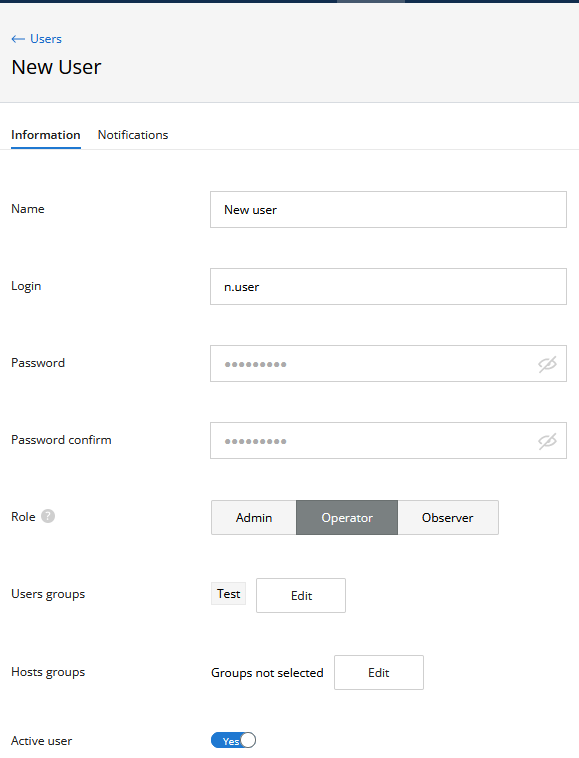
- Information - basic user account settings:
- "Name" - an arbitrary user name, such as his first and last name.
- "Email" - the email address of the user to which notifications will be sent.
- "Login" - user login used for authentication.
- "Password" and "Password confirm" - account password and confirmation.
- "Role" - account role.
- "User groups" - the list of groups where the account is included.
- "Hosts groups" - the list of devices groups that will be included in the user's visibility area.
- "Active user" - activation/deactivation flag of the user account. A user with a deactivated account will be denied the access to the NEXT web interface.
...
To apply the changes, click the "Save" button.
| Center | |||||||
|---|---|---|---|---|---|---|---|
|
...
Select the account to which the device groups should be assigned. A block with information about the selected group and management options will appear on the right. Go to the "Devices" section where all the assigned device groups are displayed. To assign a new group, click on the "Add groups" button and in the new menuwindow, check all the groups that should be assigned to the selected user account.
To deselect, click on the corresponding device group again. To apply the changes, click "OK" and then "Save".