Successfully pass the free certification exam at IW Academy and become an Infinet Certified Engineer.
R5000-Smn(c) 5-6 GHz, 19 dBi supports several installation options such as pole mounting using the supplied clamps and pipe/wall/pole mounting using the optional mount kit MONT-KIT-85c.
Installation with clamps
The clamps supplied with each device allow it to be mounted on a 32-60 mm pole.
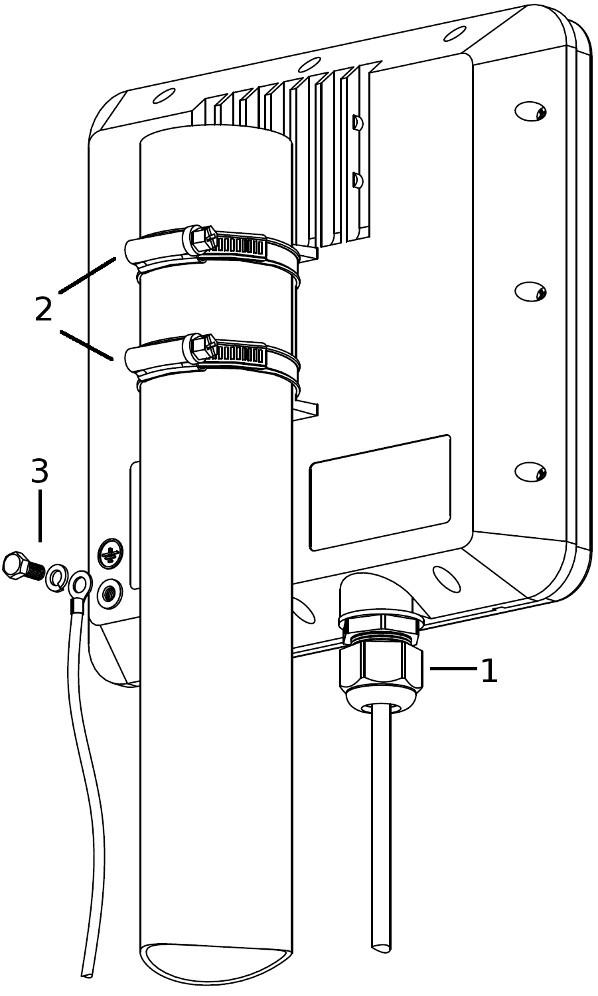
In order to mount the device on a pole follow the procedure below:
- Ensure that the cable gland (1) is assembled properly
- Attach the clamps to the pole and to the unit mounting point
- Hold the unit at the designated position and tighten the clamps by rotating the bolts (2) with a screwdriver or a 7mm wrench. Do not overtighten the clamps
- Attach the ground cable (3).
If there is a need for further alignment loosen the clamps, adjust the azimuth and tighten them again.
Installation with MONT-KIT-85c
Use the MONT-KIT-85c kit for a secure and reliable installation to a pipe/wall/pole. This kit allows 2-axis precise alignment under any mounting conditions.
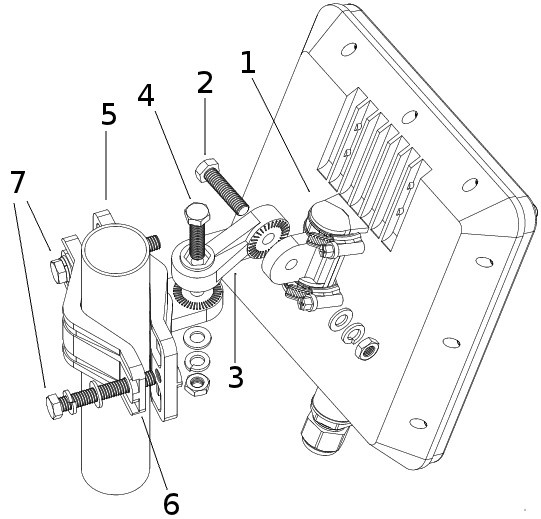
In order to mount using MONT-KIT-85c follow the procedure below:
- Attach the small mounting bracket (1) to the device using the supplied clamps. Ensure that the bracket fits correctly
- Attach the mount arm (3) to the bracket and tighten the bolt (2)
- If mounting to a wall or other flat surface, attach the metal plate (5) to the surface, assemble the binding and tighten bolts (2) and (4) until the unit is fixed in position
- If mounting to a pole (30 to 85 mm diameter), assemble the pole mounting bracket (5, 6) on the designated position. Using the 13mm wrench tighten the bolts (7) until the bracket is fixed in position, attach the unit with the mounting assembly and tighten the bolt (4)
- If there is a need for further alignment adjustments loosen the bolts (2) and (4), adjust the unit's position and tighten the bolts again.
CAUTION
In order to prevent device damage during testing or preliminary configuration in laboratory make sure that devices are configured with the lowest transmitted power (fixed, not auto) and positioned them so that they are not directed directly at each other.
PLEASE NOTE THAT VIOLATION OF THE ABOVE REQUIREMENTS VOIDS THE WARRANTY.
CAUTION
Please note that the pressure equalization system in Infinet devices is performed via gas exchange through a cable gland and Ethernet cable jacket with a dry room where the power supply is installed. In order to avoid ODU failure due to moisture entering the device, for example, during the pressure drop during the rain, the cable gland assembly requirements should be met and there are should be no cracks in the Ethernet cable jacket.
In addition, you should avoid the Ethernet cable bending near the ODU and pinching with clamps, that can bring to the pressure equalization system fault between the internal volume of the sealed ODU and the external environment during a sudden air temperature change. This may lead to the leakage and device failures.